

 Ruth Holley Library will be temporarily closed for approximately one week starting Mon., Dec. 2 to complete roof repairs.
Supplies for this Take and Make, for ages 5-12, will be available at no cost at area PPLD libraries beginning Friday, June 9, 2023.
Supplies and Directions:
Lemonade Slushies are a great way to beat the summer heat! There’s little to no mess. They’re fun for all ages. And you get slushy goodness!
Supplies:
Materials provided: 1-gallon ziploc, 1-sandwich or quart ziploc, lemonade packet
Materials you provide: water, salt, ice, spoon, cup (optional), towel (optional)
Directions:
Place ice cubes and salt in the gallon sized ziploc bag. Start with 15-20 ice cubes and 1-2 tablespoons salt.
Mix HALF of a lemonade powder packet and 8 – 10 ounces of water in the smaller ziploc. Remove as much excess air as possible and seal the bag.
Place the bag with lemonade into the bag of ice and salt. Seal the large ziploc.
Shake or knead the bags for about 5 minutes until your lemonade has become a slushie. If the bags get too cold, wrap them in a towel.
Carefully remove the lemonade bag from the larger bag. You don’t want to get salt in your lemonade. Pour it into a cup to eat it or eat it right out of the bag.
Tips:
If it seems to be taking too long, add more salt and ice.
Other beverages also work, so experiment to find your favorite.
Supplies for this Take and Make will be available at area PPLD libraries beginning May 12, 2023.
Materials and Directions:
Use the provided paper or your own supplies to draw a shape to race around on your magnet track. You might choose a vehicle (car, truck, train, boat, etc.), an animal (cow, fish, turtle, dog, etc.), or something entirely different. It should be small enough to go on your paper plate (less than 2 inches). Attach a magnet to the back using double-sided tape or a glue dot.
Use your own markers, crayons, or colored pencils to create a course on your race track.
Use double-sided tape or a glue to to attach a magnet to the end of your craft stick. Before you glue, you need to make sure that the magnet on the car and the magnet on the stick attract rather than repel each other. If they repel each other, turn the magnet for the stick over before attaching.
Test your track! Set your shape (vehicle, animal, or other) on your track. Use the magnet on the craft stick under the plate to move and race the car.
Have fun!
Find the tutorial video at https://ppld.librarymarket.com/virtual-kidsmake-magnetic-race-tracks
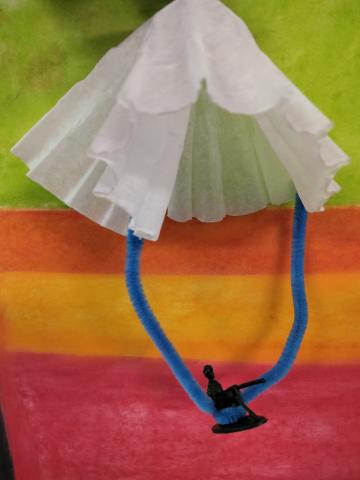
The free materials for this Take and Make (for ages 5-12), will be available at area PPLD libraries beginning April 14, 2023.
Materials and Directions:
Materials we provide:
Coffee Filter
Pipe Cleaner
Military person toy
Secure the Military person to the center of the pipe cleaner. You may choose to wrap the pipe cleaner around your person or thread it through any openings.
Poke one end of the pipe cleaner through the edge of the coffee filter. Poke the other end through the opposite side. Fold over the ends to secure.
Drop from a high place (or toss in the air) to watch your parachutist float down. It may help to pinch the center of the coffee filter first.