

Categories

Supplies:
- Crew sock (any size and color)
- Stuffing, Fiberfill, or cotton balls
- Markers
- Scissors
- Rubber bands or string
- Ribbon (optional)
Directions:
- Fill your sock with stuffing from the toe up to the heel.
- Tie off your sock at the cuff, just above the stuffing.
- Tie off your sock again, somewhere above the middle of the sock, to make a bunny head.
- Cut the cuff of your sock into two flaps. You can do this by flattening out the cuff and cutting down the middle, making sure to get through both layers of sock. You should be left with two rectangle flaps.
- Round the flaps by cutting a half circle on each end, to make them look more like ears.
- Draw a face on your bunny with markers.
- Tie a ribbon around the bunny’s neck.
- You can add more decoration to your bunny with anything else you have at home.
Watch this project at: https://www.youtube.com/watch?v=_DWILFAswxY&list=PLMEg2Dd0dSFctLfDQxsL5…

Supplies:
- Large jar (24 oz. spaghetti sauce jar or a large mason jar)
- Water - 2 1/2 cups water (or until it reaches 3/4 of the way up the jar)
- Oil - 1/2 cup
- Sprinkle in as much salt as necessary but you'd need about 1/4 cup total
- Food coloring (optional)
Directions:
- Pour water 3/4 to the top of a mason jar. Stir in optional food coloring.
- Pour oil into jar. Allow water and oil to separate.
- Sprinkle salt into jar. Watch the reaction occur and make observations.
Watch this project at: https://www.youtube.com/watch?v=v3qhs9SW-RA
The Library is here to serve you, regardless of the circumstances! While you’re welcome back inside of PPLD locations, you can still take advantage of curbside services, with a new park and text option! Our Libraries and Mobile Library Services make it easy for you to return materials and safely pickup items on holds, wireless print jobs, and take and make kits – limiting any direct contact with Library staff or other patrons. Also, don’t forget that you can still use the Library remotely and connect with a librarian by phone, live chat, or email. Learn more about our response to COVID-19 and what you can expect from the Library during the ongoing pandemic.
Returns
Book drops or return bins are available 24/7 outside of all libraries, so you’re welcome to return books, movies, and other physical items anytime that’s convenient for you.
Holds
Ready to pick-up an item on hold, wireless print job, or take and make kits? Locations are now offering a park and text option to make it even easier for you! Simply drive, bike, or walk up, and have your library card number and PIN ready. Upon arrival, you’ll want to follow the available instructions like park and text, drive-thru, or walk up to the table. (Curbside hours and instructions vary by location, so please check below or by phone.) Then you’ll be on your way to enjoy a new book, movie, or other finds! Click on your Library location below to see their curbside service hours, phone numbers, and pickup instructions:
Homebound patrons can designate another person to pick up their holds. Please call your Library for more information and to schedule such a pickup. For new items, place your hold in the Catalog or mobile app and select your preferred location for pickup. Once you receive your email or text notification (if opted in), check your Library’s curbside schedule and procedures for pickup. For curbside pickup, Library patrons are encouraged to follow public health guidance, including staying 6 feet apart from others.
Wireless Printing
We also offer wireless printing at our libraries! Submit your print job here, then follow curbside service instructions for your pickup location during their open hours. Hours and pickup instructions can be found through the links above. For Mobile Library Services, please call ahead for such pickups.
While the Pikes Peak Children's Water Festival has been cancelled for 2020, over a dozen partner organizations have provided educational water-related worksheets, activities, and interactive videos to promote the importance of this precious resource for 3rd - 5th graders. Find these materials on the Pikes Peak Children’s Water Festival website: https://coloradosprings.gov/waterfestival

Supplies:
- Paper towel cardboard tube
- Stapler
- Scissors
- Glue
- Pieces of cardboard
- 2-3 bamboo skewers
- Recycled materials and craft materials - can tabs, bottle caps, pipe cleaners, paper clips, etc.
- Stickers- optional
- Paint and paintbrush - optional
- Markers - optional
Directions:
- Press down on one end of the paper towel tube and staple two times, closing up that end.
- Cut a small v-shaped notch in the middle of the closed end of the tube, between the staples.
- Decorate tube with paint, stickers, or markers.
- Cut out pieces of corrugated cardboard. One rectangle about 6" x 4" and smaller rectangles and triangles. Paint or decorate.
- Glue the open end of the cardboard tube onto the middle of the 6" x 4" rectangle piece of cardboard. Let dry 1-2 hours.
- After you've decorated the cardboard pieces, take a bamboo skewer and carefully thread the pointed end of the skewer through the wavy corrugated spaces inside the cardboard until the skewer comes out the other side.
- Add various other pieces of recycled materials to each side of your balance art. See if you can still make it balance. Find the center of gravity, which is the point where where all the weight of your art piece is centered so balance can occur.
- Decorate the base with caps or other recycled pieces.
Do the same with another shape of cardboard on the other end of the skewer. Try balancing these two pieces by placing the skewer into the notch you created on the closed end of your cardboard tube.
Watch this project at: https://www.youtube.com/watch?v=d_spLdHMzeg
Supplies:
- Plain white paper - 1 sheet
- Construction paper - 1 sheet any color
- Scissors
- Glue (or tape)
- Markers
- Paper clips - 2
- Stickers (optional)
Directions:
- Fold construction paper in half and place a paper clip on the top and the bottom of the folded paper to hold paper in place.
- Lay your hand down onto the paper, and trace around your fingers with a marker or pencil.
- Cut out your traced hand out, and try to cut just inside the tracing line as you cut. You may want to move the paper clips to secure the hand shape as you cut. You'll be cutting through two pieces of paper since your paper is folded in half.
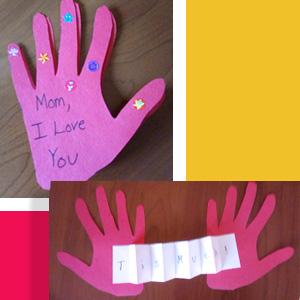
- Take one hand for the front of the card and write something like, "Mom, I love you".
- With the white piece of paper, cut a strip off the long side about 2" wide. Fold the strip accordion style. (Fold a bit at one end and flip over and fold again, do this about 10 times.)
- On the accordion folded paper, write "THIS MUCH!".
- Glue each end of the accordion folded paper onto the back side of each hand piece.
- Decorate the front of your card with stickers or designs. Write your name on the back of your card.
Watch this project at: https://www.youtube.com/watch?v=gF6TujsXzzc&list=PLMEg2Dd0dSFctLfDQxsL5…

Supplies:
- Packing tape (or clear contact paper)
- Scissors
- Masking or painter's tape
- Markers or something to write with
- Paper
- A postage stamp
- Decoration options: old greeting cards, confetti, easter grass, buttons, glitter, hole punches, pictures cute out of old magazines, newspaper or book pages, beads, stickers, yarn, any small, mostly flat craft materials you happen to have
Directions:
- Lay out three strips of packing tape face up. Carefully overlap the pieces to create a sticky sheet.
- Use masking tape to attach your packing tape sheet to the table so you have a good work area.
- Cut a piece of paper and on one side write the name and address of the recipient, on the other write a note or draw a picture.
- Decorate!
- Add your stamp to the upper left hand corner.
- Use three more pieces of packing tape to cover your entire work area.
- Peel your postcard off the table and trim off the masking tape, cutting your postcard into the shape you want.
- Drop it in the mailbox and send it to your loved one!
Watch this project at: https://www.youtube.com/watch?v=qHJFlwzeHkU&t=13s

Supplies:
- Uncooked eggs
- Clear drinking glass or plastic cup
- Distilled white vinegar
- Food Coloring
- Spoon
- Bowl of water
- Tray to hold your experiment (optional)
Directions:
- Carefully place an uncooked egg in a clear glass or plastic cup.
- Pour enough vinegar into the cup to completely cover the egg.
- Add some generous drops of food coloring and stir gently. If you want a rainbow of colors, prepare a few more cups.
- Now it’s time to WAIT! Observe your eggs each day. The vinegar will slowly dissolve the eggshell over 2-3 days. You’ll see the liquid bubbling as this happens.
- After 3-5 days, remove the eggs from the vinegar, and place them in a bowl of water. Gently rub away any remaining bubbly shell residue to reveal the membrane that lies just below it.
- You can gently bounce your eggs! The eggs will be rubbery and bouncy but they are still raw on the inside. Bounce and press it to test just how rubbery it is … and beware, it may break! If it does, you can see what it looks like inside.
Watch this project at : https://youtu.be/CO9ay4euXVg
Parents and Educators! Do you know what resources are available to you on PPLD Kids? Go to this link to do the scavenger hunt: https://docs.google.com/forms/d/e/1FAIpQLScSIwSqDMcJFisY9TsiEO47000SMFs…

Pikes Peak Library District staff has shown dedication to the Library’s mission and tireless efforts to serve the community in many ways. We will continue to explore how PPLD can help people and organizations across the Pikes Peak region—well beyond our Library resources and services. Here are some ways that the Library has responded to community needs during the COVID-19 pandemic:
- We donated 400 surgical masks and 6,000 gloves to the Pikes Peak Regional Office of Emergency Management.
- Our team loaned out 3D printers to support Colorado’s Make4Covid initiative, which connects “makers” with equipment to produce protective gear for local healthcare workers.
- We’re partnering with school districts and local businesses to provide individuals with reading material while they pickup food and beverages. (Thank you to the Friends of the Pikes Peak Library District for making this possible!)
- Sand Creek Library serves a donation site for the Southeast Supply Drive, helping collect common household items needed by individuals and families in the area.
- Community partners are borrowing PPLD laptops and hotspots, so more residents can apply for unemployment and other benefits, as well as search for jobs.
- Penrose Library has made drinking water available outside of their building, so anyone can fill containers whenever needed. (Thanks to Olson Plumbing & Heating, Rampart Supply, and Colorado Sheet Metal for donating the supplies!)
- We provided books, DVDs, and laptops to the City Auditorium’s isolation shelter, setup for those experiencing homelessness who have symptoms of COVID-19.


No matter the circumstances, we remain steadfast in providing Library resources and services that impact lives and build community across El Paso County. Thank you for entrusting us to be responsive to community needs and serve residents in new ways and virtual spaces, now and into the future.

Supplies:
- Scissors
- Glue
- Pencil (optional)
- Button or foil (used gum wrapper works well)
- Six different colors of construction paper or different color paper ads
Directions:
- Pick a color of paper and cut a small circle (about 2" diameter). You may also draw a circle first with your pencil and then cut it out.
- Take the first circle and place it on another color. Holding the first circle, or glue it down with a small dab of glue, cut around the first circle, just a bit bigger (1/2" bigger for example). Repeat this process using four more different colors.
- Before you fully glue your circles together, decide whether you want to cut fringe around the circle by cutting small slits around the circle's edge.
- Arrange your circles on top of each other, small to large. Finish your flower by gluing a button to the middle of the flower or even a recycled foil (gum wrapper) circle.
- For the stem, cut a thin strip of green construction paper or recycled greenish paper. Cut a leaf or two and glue to the stem.
Watch this project at: https://www.youtube.com/watch?v=0aNRHsAWI0U&list=PLMEg2Dd0dSFctLfDQxsL5…

Supplies:
- Epsom salt
- Hot water
- Jar
- Measuring cup
- Food coloring (optional)
- Spoon
- Bowl or cup for mixing
- Sand or small pebbles
Directions:
- You will need equal parts salt and water, you can decide how much based on the size of your jar. Measure out the salt and add it to your jar.
- Measure out the same amount of water and add to your mixing bowl or cup. If you are adding food coloring, put a few drops in the water and mix with your spoon.
- Pour colored water into jar with salt.
- Mix for 1-2 minutes.
- Add a tiny bit of sand or a pebble or two for the crystals to grow on.
- Put your jar in the fridge or, to jump start the process, put it in the freezer for 10 minutes before moving it into the fridge over night.
- Pour out the solution to reveal your crystals!
Watch this project at: https://youtu.be/e-OZVxuchkU

Presenting strategies for dealing with anxiety, tools for emotional awareness, themes of encouragement, hope, and love, these books, available in electronic formats, provide comfort during tough times.
Need help accessing electronic materials? Go to PPLD’s eLibrary to get started.
Click on link below to see booklist:
Supplies:
- Paper towel, wrapping paper, or toilet paper roll
- Paper to cover tube (optional) – Can use construction paper, brown bags, or wrapping paper
- Markers and/or crayons
- Elmer’s Glue or glue stick
- Scissors (Adult supervision needed.)
- Hole punch (You can use scissors if you don’t have a hole punch.)
- Scotch tape
- String, yarn, or ribbon
- Pipe cleaners, popsicle sticks, pencils, or rulers for marionette handle
- Miscellaneous items around the house (twist ties, buttons, etc.) to use for decorating
Directions:
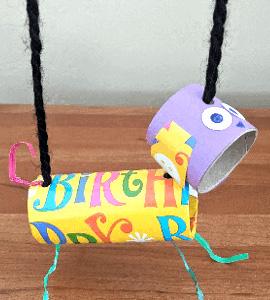
- If you are using a paper towel roll, cut it in half.
- Take the half tube and cut it again about ¾ of the way down. The smaller part will be the head.
- Decorate the tube using paper, colors, paint, and/or stickers.
- Starting with the longer part of the tube, have an adult cut or punch holes on one side for legs. Cut/punch holes for the number of legs your creature will have. It can have as many or as few legs as you want.
- Make legs for your creature, using items around your house (twist ties, pipe cleaners, yarn, etc.). Once the legs are inserted in the holes, tape them in place.
- Create the head (small piece of paper towel tube). Add whatever details you want.
- Now you are ready to connect the head to the body. Punch or cut two holes on the opposite side of the legs. Then punch or cut two holes on the small tube – one on top and one directly underneath it.
- Cut 2 pieces of yarn, string, or ribbon the same length – at least 18 inches. Tie one piece of yarn to the front and one to the back of the long tube. Secure inside with a knot and tape.
- Take the yarn on the front side and slide the head on it. Make a knot inside the small tube to secure the head in place.
- To make the marionette cross bar, take to pencils (or rulers or craft sticks) and cross them to make an “X”. Tie the two pencils together using pipe cleaners, twist ties, or tape.
- Add the two strings attached to the puppet across from each other on one pencil. Secure with tape.
- Put on a play with your puppet and entertain your family!
Pikes Peak Library District is here to help you! We can answer your questions in-person at one of our library locations or by phone and email!
- Give us a call!
Speak with a reference librarian by calling (719) 531-6333, option 3. This phone service is available during the following days and hours:- Monday through Thursday from 9 a.m. to 7 p.m.
- Friday and Saturday from 10 a.m. to 5 p.m.
- Closed Sunday.
- Send an email!
Use our online “contact us” form, to submit your inquiry. Then, a PPLD team member will follow-up via email soon. - Book a Librarian!
Can’t find the information you need? Have a research project? We’re here to help! Professional librarians are available to meet one-on-one to assist with research questions.

Supplies:
- Half a cardboard egg carton
- Scrap pieces of newspaper or other paper
- Tape: masking tape, or painter's tape, or scotch tape
- 7 rubber bands
- Plastic spoon
- Pompoms or cotton balls or mini marshmallows
- Various clean containers
Directions:
- Stuff each section of the egg carton with balled up newspaper.
- Close the lid and secure with 2 rubber bands, placed around the body of the carton.
- Wrap 2 more rubber bands horizontally around the carton, just below where the lid closes.
- Tape a rubber band to the handle of the spoon by attaching a long piece of tape to one side of the handle and inserting a rubber band before attaching the tape to the back of the spoon.
- Tuck the handle of the spoon under the rubber bands that were attached horizontally around the carton. The scoop part of the spoon should be facing away from the egg carton.
- Stretch the rubber band that's attached to the spoon up and over the spoon and around the back of the carton.
- Wrap 2 more rubber bands around the body of the carton so there are 4 rubber bands around the carton helping to keep it closed.
- Place a cotton ball in the spoon and shoot!. Place clean containers where you can aim your cotton ball.
To watch the project, go to: https://www.youtube.com/watch?v=V4o4eC5E_Qs

Supplies:
- Empty tissue box
- White scrap paper
- Markers
- Glue
- Old catalogues or magazines
- Colorful paper (wrapping, scrap booking, or construction paper work well)
Directions:
- Decorate your tissue box with markers or colorful paper. Stickers can also be fun!
- Cut your white scrap paper into 2 or 3 inch squares to make little cards.
- Draw one person, place, or thing on one side of each card. Leave the other side blank. You can also choose to cut out images from old catalogs and magazines and glue them to the cards.
- Place all finished cards (once they are dry) inside your decorated box.
- To play, draw three cards from the box and use them to tell a story. Play with others by taking turns drawing a card from the box and adding to a group story.
Watch the project at: https://www.youtube.com/watch?v=vwflHOAeCSo

Supplies:
- Ruler (12" or 18" or 36") or measuring tape
- Yarn or string
- Scissor
- A stuffed animal or your pet
Directions:
- Measure, as best you can, your pet or stuffed animal and determine its length in inches.
- After you know how many inches, cut a piece of string or yarn the same length.
- Take this piece of string and measure items around your house. How many cats (or hamsters or dogs, etc.) long is your kitchen? Your table? Your bed?
Please leave a comment below, tell us what you used to measure items around your house.
You can watch this project at: https://www.youtube.com/watch?v=jCU1Ks8mBf0
Updated July 1, 2021
Enjoy our entertaining and educational programs from home! We offer a variety of virtual services and programs for people of ages and interests. Plus, you can use the Library remotely in other ways, anywhere and anytime, and connect with a librarian by phone, live chat, or email! Visit our virtual calendar of events for all scheduled programs and activities. Can’t participate live? No worries! Many of the videos are featured on our YouTube channel and playlists, so you can watch whenever it’s convenient for you. Here’s a handy overview of some virtual opportunities that our team created for you to experience:
FOR EVERYONE:
- Live Virtual Programs From homeschool programs to tours of local institutions, PPLD has you covered.
- Take and Make Library Crafts Missing your Library's programs? Exhausted your home crafting ideas? PPLD has you covered! Presenting.. Take and Make programs! Your Library will now have crafts available to TAKE home and either follow a virtual class or included instructions to MAKE! Kits are available for all ages.
FOR ADULTS:
- Virtual Yoga Local instructor Svetlana Nudelman guides practitioners through beginner and intermediate-level yoga poses.
- Virtual Book Club
- Genealogy with PPLD Are you interested in learning more about how PPLD can support your genealogical research? Learn research strategies including getting started, organizing research, selecting and searching for records, and more!
FOR TEENS:
Click here to see all teen virtual programming.
Teens programs are available for viewing anytime on the PPLDTV YouTube Channel.
- Teens Make
- Teen Tech
- Teen Games
- Teens Eat
- Teen Fandom
- Teen Self-Care
- Review Crew Anyone from 13 - 18 years old can write an original book review and get an hour of volunteer credit! Check out some past book reviews for examples. Those who are interested can apply here.
Family & Children's Services Virtual Programs
Videos are available for viewing anytime on the PPLDTV YouTube channel.
- Baby Time Children’s Staff from around the district invite babies from 0 - 12 months, with a favorite adult, to enjoy music, rhymes, and a book together!
- Children's Performers Performers can be viewed anytime on PPLDTV!
- Homeschool Programs Whether you've been homeschooling for years or are just getting started with eLearning, our homeschool programs are here to help!
- KidsMake Children’s staff from around the district lead an art or make project for kids ages 5 - 12.
- STEM Children’s staff from around the district lead a STEM (Science, Technology, Engineering, and Mathematics) based project for kids ages 5 - 12.
- Storytime Children’s Staff from around the district invite you to join in a sing-along and then read a children’s book.
- Toddler Time Children’s Staff from around the district invite 1 and 2-year-old children, with a favorite adult, to enjoy rhymes, music and movement, and a few short books!
- Tween Twist
- LENA Start A 11-week program where parents learn how to increase conversational turns with their babies and toddlers.
- Prenatal Series Are you expecting and have so many questions? Join Pikes Peak Library District and Nurse Family Partnership for a series of prenatal classes.
- Storytime @ Home Our Family and Children's Services librarians are creating Storytime at Home materials for you and you family to enjoy. Every themed Storytime includes top literary picks with easy links to our online Catalog, music, crafting, and literacy tips.
- Stroll-a-Story and Math Strolls Walk together and enjoy the benefits of some physical activity.
- Reassuring Reads for Kids This always-available list presents reading options (available in electronic formats) that can provide comfort during tough times for kids and parents. The recommended books cover themes of encouragement, hope, and love while offering tools for emotional awareness and ways to deal with anxiety.
- Kid-Friendly Music Playlist Our staff selected and compiled more than four hours of children's music on Freegal, PPLD’s streaming service for songs, albums, and more. (Pro tip: Browse other playlists, or create your own!)
Don’t see anything that interests you right now? Bookmark this page for frequent updates, or visit our calendar of virtual events for new additions each week. Stay tuned for more updates from PPLD! Our team continues to explore and expand virtual opportunities that we can bring to you, wherever you may be.

Supplies:
- 2/3 c. warm water
- 2 T. dish soap
- Food coloring - 4 drops of any color you want
- Bowl and whisk or a mixer
- Paper towel or paper
Directions:
Place ingredients in a bowl and whip for 2 minutes. Make another batch of a different color. (Blue + Red = Purple, or Red + Yellow= Orange, or Blue + Yellow= Green) Take your paper towel or paper and lay over the colorful play foam in the bowl. Make some art! You can also make a couple batches to take into the bathtub.
You can watch this project at: https://www.youtube.com/watch?v=P7mHotWXvpg

Looking for a chapter book to listen to or read aloud with the family? Check out this selection of engaging chapter books in a variety of genres all available in electronic formats. Need help accessing these materials? Go to PPLD’s eLibrary to get started. Click on the pdf below to see the booklist.

Supplies:
- One piece of paper
- 2 additional smaller pieces of paper to keep score
- Marker pen
- 2 pencils
- 36 water bottle caps, marked with two different colors, one color on top, the other color on the bottom (Coins work well because they have two different sides already, heads and tails).
Directions:
- Draw a grid on the paper with the marker pen. Draw 6 spaces by 6 spaces for a total of 36 spaces on your paper.
- Put your names at the top of each of the smaller pieces of paper.
- To play:
- Put two of each players' markers onto the middle four squares of the grid. (We'll call the markers pink and green.)
- The first player adds a green marker to the board, placing it beside a pink marker that it has now "trapped" between two green markers. Flip the "trapped" pink marker to the green side. Score one point for each of your opponent's pieces that you are able to trap and flip each turn. The next player adds a pink marker to the board in the same way, "trapping" a green piece and flipping it to the pink side and scoring one for flipping one piece.
- Take turns and be sure to notice possible ways to trap your opponent's pieces either vertically, horizontally, or diagonally. As you get better at the game, you'll be able to trap multiple pieces in different directions. If you cannot find an opponent's piece to trap, you have to skip your turn.
- To score, either count up each player's points or count how many of each players' markers show when the grid is full.
You can watch this project at: You can watch this project at: https://www.youtube.com/watch?v=kz38AUe91iQ

Supplies:
- 10 water bottle caps (or any caps)
- Elmer's glue
- Yarn cut into 4 strands about 5" long
- Square of cardboard cut from a cereal box
- Stickers, optional
Directions:
- Cut a square size piece of cardboard.
- With glue, make two thin lines of glue vertically, and again, horizontally, keep the lines evenly spaced (see photo).
- Place one yarn strand on each glue line. Let dry. Trim yarn hanging off the edge of the cardboard.
- Mark five water bottle caps one way, and five caps another way. (Color the caps or attach the same sticker to five caps and a different sticker to the other five caps.)
- You are ready to play Tic-Tac-Toe!
You can watch this project at: https://www.youtube.com/watch?v=kz38AUe91iQ

Supplies:
- Any citrus fruit like a lemon, lime, or orange
- knife with a parent or caregiver nearby
- large tray or cookie sheet
- baking soda
- vinegar
- lemon juice
- dish soap
- spoon or coffee stirrer
- food coloring (optional)
Directions:
- Cut the tip off the fruit and then cut in half. Place on tray, sitting upright.
- Poke fruit with spoon or coffee stirrer to get juices flowing.
- Pour a little dish soap onto the fruit.
- Sprinkle baking soda onto the fruit.
- Squeeze drops of food coloring onto the fruit.
- Speed up the base/acid chemical reaction by adding drops of vinegar also!
You can watch this project at: https://www.youtube.com/watch?v=MCL7lOrY5-s

Supplies:
- cardboard
- pencil
- scissors
- markers
- scotch tape
- white paper
- a parent or caregiver nearby
Directions:
- Trace any size circle onto a piece of cardboard. Have your parent or caregiver cut out the circle if needed.
- Trace the round piece of cardboard onto the white paper. Cut out the paper circle.
- Draw a design onto the round piece of paper. A fun experiment is to use the three primary colors: red, blue, and yellow so you can see green, orange, and purple appear when you spin.
- Have your parent or caregiver cut a slit into the center of the cardboard circle and also the round paper. Tape your design onto the round piece of cardboard by making tape loops. You may also glue your paper onto the cardboard.
- Push a penny into the slit and spin!
You can watch this project at: https://www.youtube.com/watch?v=wL4ZKcEDHkQ