Take and Makes for this project will be available at area PPLD libraries beginning this Friday, April 16, 2021.

The video instructions are available at: https://tinyurl.com/PPLDVirtualSTEM

Supplies and Directions:

Materials included: Cork, two 12 inch bamboo skewers, toothpick, modeling clay, googly eyes
Materials needed: glue, paint or markers (optional)

  1. Push the pointy end of a skewer into one side of the cork at a 45 degree angle; repeat on the other side just opposite the first skewer.
  2. Push the toothpick in the center of the bottom of the cork. (*The skewers should be pointing down.)
  3. Roll two equal-sized balls of clay and press them onto the bottom ends of the skewers.
  4. Glue the two googly eyes on the cork. You’ll need to allow time for glue to dry. If you want, you can use paint or a marker to add more details to the face.
  5. Place the tip of the toothpick on your finger and see if it balances. If it leans too much to one side, adjust the angle of the skewers one at a time until the cork stands upright when balanced on the tip of your finger.

Now, have some fun! See if you can gently spin your Balancing Buddy on the tip of your finger. Try walking around the house while keeping the Balancing Buddy in place. Can you balance Balancing Buddy on your elbow? Your knee? What other experiments can you do with your Balancing Buddy?

balancing buddybalancing buddy

The science behind the project:

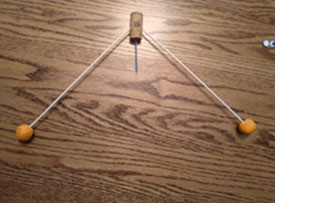
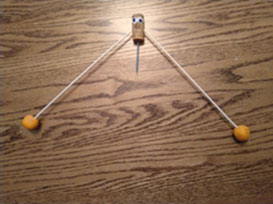
Everything has a center of gravity, which is the point at which its mass is evenly distributed. The clay balls are heavier than the cork, so they bring the center of gravity to the bottom of the toothpick. That’s why the bottom of the toothpick will balance on your fingertip!

Take and Makes for origami fun, for ages 9-12, will be available at area PPLD libraries beginning Friday, April 9, 2021.

Supplies:

Take and Makes will supply assorted Origami paper
Optional supplies needed needed from home: Scissors and a pen, pencil, or marker

Directions:

Star Wars X-wing Starfighter
Watch this project at: https://youtu.be/GyOw1JMO4hI and see pdf below for pictures.

  1. Fold Paper in half.
  2. Fold paper in half again to create a small square.
  3. Fold the square into a triangle.
  4. Unfold paper completely. Fold sides into each other to create a large triangle. You may want to watch the video for this step.
  5. Fold bottom corner of top side down to the crease. Repeat on the other side.
  6. Flip paper over and follow step 5.
  7. Fold bottom corner of one side up so that it creates a new triangle with a flat side on top. Repeat on other side. Flip paper and repeat.
  8. Fold the bottom edge to top of new triangle edge. Repeat on 3 other sides. This will complete the wings.
  9. Fold wing tips down to create guns on the wings.
  10. Enjoy your finished X-wing fighter!

See directions below for a cool Tortoise project also!

Take and Makes for this project, for ages 2-5, are available starting April 2, 2021 at area PPLD libraries.

Brighten up a wintry day with a tissue paper "stained glass" decoration. Hold your finished project up to a window or a light and let the colors shine through! For ages 2-5.

Supplies:

Included in kit:

  • 2 pieces wax paper
  • 4 strips construction paper (for frame)
  • 2 pieces of tissue paper

Supplies you provide:

  • Glue stick or tape
  • Child-safe scissors, Optional

Directions:

  1. Cut or tear the tissue paper into smaller pieces.
  2. Glue tissue paper to one of the pieces of wax paper until the wax paper is filled, or the design is complete. Don’t worry about the tissue paper being over the edge. It will be trimmed later. NOTE: It is easier to spread the glue on the wax paper and then lay the tissue paper on the glue.
  3. Take the 4 strips of construction paper and glue them to the edges to create a frame.
  4. Trim the frame.
  5. Glue the 2nd piece of wax paper onto the tissue paper and frame.
  6. Find a window to display your “stained glass"!

Your child can use child-safe scissors to cut the tissue paper. However, when a child tears pieces of paper, they improve hand strength in the small muscles in their hands. These small muscles are important in many fine motor skills – coloring, handwriting, buttoning buttons, building puzzles, and more! Tearing paper also improves hand-eye coordination and the ability of hands to work together. Both skills are needed to write and to use scissors.

What other works of art can you and your child create with torn paper?