Image
![]()
Take and Makes for this project (ages 7 and up) are currently available at PPLD area libraries.
Watch the Giving Thanks video tutorial on YouTube: https://youtu.be/6oRb42V4l-E?list=PLMEg2Dd0dSFctLfDQxsL5SmuE8zkwQFmu
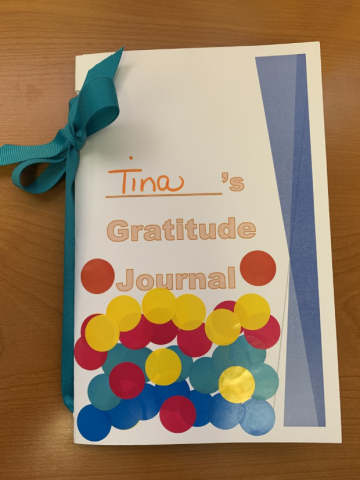
Supplies Included: Gratitude Journal (cover and pages—pages are already in the correct order); stickers for decorating; ribbon for securing pages and decoration
Supplies from Home: Crayons, markers, and/or pens; stapler or hole punch; scissors; glue stick or Elmer’s glue; old magazines or photos to cut for a collage. (A collage is a visual art form that uses photographs or paper/fabric images that are glued onto a backing.)
You can find all the instructions with explanatory photos in the video!
Step 1: Prepare Your Gratitude Journal
Step 2: Be Creative (or Not) in Designing the Cover
Step 3: Find a Comfortable Place, Choose a Page, and Begin Journaling
There are many ways to journal. You can free write on the topic of gratitude and thankfulness. Also, you can use various art forms. Try our acrostic poem page. Or create collage pages with copies of photos or old magazine images. Drawing is another way to express yourself in your journal. Most of all, make your Gratitude Journal meaningful to you.
Why a Gratitude Journal?
Studies show that practicing gratitude makes us happier. Focusing on people and things that you are thankful for can help you feel joyful.
When we express appreciation, it is good for friendships. When we tell people thank you and what you like about them, it helps us focus on the positive things about a person, and then we feel better about our friendships. Telling someone what you like about them or acknowledging a person’s kindness helps them to feel good, too.
Take and Makes for this project will be available at area PPLD libraries beginning Friday, Nov. 12, 2021.
Step 1
Gather your supplies.
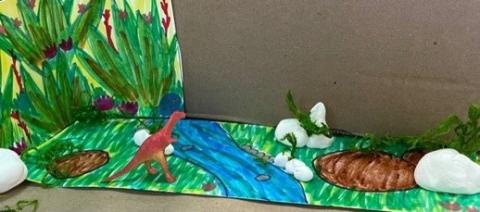
Provided in your bag: cardstock, clay, moss, dinosaur
From home: colored pencils/crayons/markers, scissors, tape
Step 2
Cut your cardstock strip so that you have a strip to make the ground of your dinosaur habitat and a strip to make a background (you might need a grownup’s help with this).
Step 3
Decorate both strips of cardstock with your markers. Maybe there are a bunch of leafy plants in the background or a big sun; maybe the ground has a river running through it.
Step 4
Secure your strips with tape so the background stands up.
Step 5
Now add the 3D things! Use the clay to mold rocks, mountains, dino eggs - whatever you like!
Add the moss to give your habitat some extra plant life. Finally, name your dino and put them in
their new home!
Take and Makes for this project will be available at area PPLD libraries beginning Friday, Nov. 5, 2021.
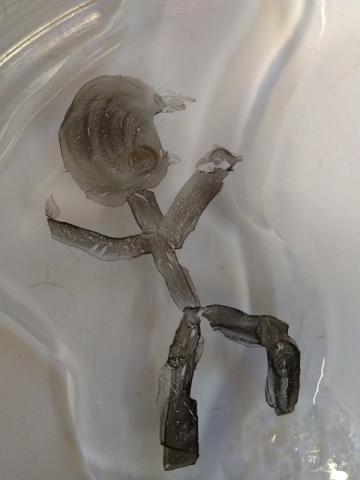
Materials we provide: Dry Erase Marker
Materials you provide: Glass or ceramic surface (Pyrex pans, plates, bathtubs, etc.), Water
TIPS:
This works because dry erase markers are mostly made up of alcohol and a release agent made of silicon oils. When you write on the plate or Pyrex dish, the alcohol evaporates and just leaves behind the ink and release agent. We all know that oil and water don’t mix, so the ink with the oils in the release agent just float to the top!

