


When: Sat., April 27, 2024 - 10 a.m. to 3 p.m.
Where: Library 21c
A maker is someone who creates – to be innovative, to solve problems, to bring something beautiful into the world, or simply to have fun. They have an idea and they bring it to life. Making can encompass just about anything, from high tech to low tech to no tech, from art to fabrication to artistic fabrication, from needles to table saws to software.
Join us for this event as we spend the day celebrating ingenuity in the Pikes Peak Region – by tinkering, thinking, and, of course, making! Past experiences include:
- Paper rockets
- Lego builds
- Local makerspaces
- Cosplay
- Whittling
- Cardboard creations
- 3D printing
- And so much more
If you have any questions, please email us at APPM@ppld.org.
PPLD will be selling a variety of old equipment during the event. Items will include old gaming systems, computers, monitors, old makerspace equipment, and more. Sales will be as-is, cash only with the buyer taking the item with them on the day of the event.

Interested in seeing some amazing experiments from up-and-coming scientists? Visit our annual Homeschool Science Fair to browse and chat with project creators. Kids can fill out a "What I learned" and receive a prize! Come and discover something new, or be inspired for next year!
- When: Between March 18 - March 28, 2024
- Where: The Venue at Library 21c
Our annual Homeschool Science Fair is open to grades K-12! Homeschool students are invited to demonstrate a science project for other families. There are no rules or guidelines for this non-competitive event, and planning is left up to individual families.
Registration required. Students will arrive by 9:15 a.m., and the event will be open to the public from 10 - 11:30 a.m.
Need help planning your project? Download our Science Fair How-Tos Document!

December is packed with festive celebrations, including Hannukah, winter solstice, Christmas, Kwanzaa, and others. It’s a busy time when you may find yourself decorating, planning or prepping meals and treats, making or shopping for gifts, visiting friends and family, and attending community celebrations. Pikes Peak Library District has all the programs, tools, and resources you need to make the best of the holiday season, including cookbooks and classes, DIY gifts, holiday book lists, and more!
Resources
- New recipes from a vast array of new-to-you cookbooks for all occasions
- Movies, music, books, and even a collection of Hallmark movies on Hoopla
- Audio and video studio equipment for DIY memories
- CultureGrams to learn about holiday celebrations from around the world (must have a library card that starts with a 4 to access outside the Library)
- Reviews, shopping guides, and more for your holiday shopping experience with Consumer Reports (must have a library card that starts with a 4 to access outside the Library)
- A wide assortment of holiday films and documentaries on Kanopy
- Christmas music on Freegal
DIY Gifts
- Don’t miss our Makerspace Holiday Open Houses at East Library, Sand Creek Library, and Library 21c this month to learn how you can use makerspace equipment to create DIY gifts and decorations.
- Find craft inspiration or delve into new hobbies with the Hobbies & Crafts Reference Center. (Must have a library card that starts with a 4 to access outside the Library)
- Join us for makerspace classes and use your new knowledge to make custom gifts for your loved ones.
- Discover DIY gift ideas with our array of creative books.
Websites
- December 2022 Holidays
Explore national, religious, and just for fun holidays that take place in December. - National Geographic: Winter Celebrations
Fill your December with festive fun facts, folklore, and holiday information.
Friends of PPLD Bookstore
Get gifts for your family while supporting your Library! The Friends of PPLD sponsors and supports numerous programs and events to further the enjoyment of reading and love for books by all individuals. They are best known for their volunteerism, their bookstores in each library (you never know what you will find in the ever-changing inventory of previously-read books and magazines) and, of course, the two Big Book Sales each year.
Stop by the Friends store at the Library and find books, CDs, movies, magazines, and more from $0.25 to $3. Or shop for specialty items online! Purchases made through the Friends of PPLD support library programming and materials.
Do you love books, reading, and libraries? Have you considered becoming involved in your community? One easy step covers it all! Get involved with the Friends and support your community, one book at a time.
Programs
-
Forté Handbell Quartet
Ring in the season with Forté Handbell Quartet! This talented group will perform familiar holiday classics and more. Registration is not required. Seating is available for the first 175 guests. This event is sponsored by the Friends of the Pikes Peak Library District.
-
Wrap & Yap Party
Get a head start on your gift wrapping at the Wrap & Yap Party! Get gift wrapping tips from the Library and fellow participants. Enjoy hot cocoa and cider while you work.
-
Peppermint Mocha-Scented Candle Mugs
Need an affordable gift or want to treat yourself? Make a peppermint mocha-scented candle in your own mug or one provided by the Library. Registration required.
- Ute Pass Library: Sat., Dec. 2 from 11:30 a.m. - 12:45 p.m.
- Ruth Holley Library: Tue., Dec. 5 from 2 - 3:30 p.m.
- Monument Library: Fri., Dec. 8 from 11 a.m. - 12:30 p.m.
- Library 21c: Sat., Dec. 9 from 2 - 3:30 p.m.
- Fountain Library: Fri., Dec. 15 from 1 - 2:30 p.m.
- Cheyenne Mountain Library: Mon., Dec. 18 from 10:30 a.m. - noon
-
Sock Gnomes
Do you have socks that lack their mate? Bring them to this program to upcycle them into a cute, decorative Sock Gnome! Registration required.
-
Winter Wonderland Crafts
Join us for an afternoon of winter holiday fun! Make a peppermint mocha-scented candle mug or a sock gnome for yourself or as a gift. Or get a head start on your gift wrapping at the Wrap & Yap Party! Get gift wrapping tips from the library and fellow participants. Enjoy hot cocoa and cider while you work. Registration required.
-
Pop-up Gift Making (Tweens and teens ages 12 - 18)
Come make some fun little gifts for friends and family this holiday season! We will have supplies to make: Perler bead ornaments and keychains.
-
Meet a Master Maker: Festive Wall Hanging (open to ages 9 and up)
Join us at the Sand Creek makerspace to meet Master Maker, Debbie Urquijo! In this hands-on demonstration, Debbie will show you how to use the laser to create a festive wall hanging. Registration required. This program is for ages 9 and up.
-
Makerspace Holiday Open House
Bring yourself or the whole family to the makerspace to make some fun holiday crafts perfect for gifting. You will also get to learn more about the resources and equipment available year-round in the makerspace. All ages are welcome. All materials provided.
-
Seasonal Baking: Fig Newtons (Ages 9 and up)
Chilly weather got you down? Warm up in the kitchen and join us to make a delicious and comforting fig newton recipe. In this class, you will learn about seasonal baking and proper cooking techniques while you cook and enjoy a sweet culinary treat. This program is for ages 9 and up.
All attendees will be required to sign a waiver for working in the kitchen.
-
Holiday Card Making
Make your own holiday cards, under the tutelage of local crafts guru Theresa Pingel, to send to your friends and family. All materials will be provided. Beginner/Intermediate skill level. Registration required.
-
Seasonal Baking: Scones (Ages 9 and up)
Chilly weather got you down? Warm up in the kitchen and join us to make a delicious and comforting scone recipe. In this class, you will learn about the history of scones and proper cooking techniques while you cook and enjoy a sweet culinary treat. For ages 9 and up.
All attendees will be required to sign a waiver for working in the kitchen.
-
Ugly Sweater Party (Kids and tweens)
Join us at Ute Pass Library for an Ugly Sweater Party! We will be decorating festive cookies and upcycling clothing into ugly sweater creations. The library will provide all decorating supplies and cookies. Please bring your own clothing to decorate, such as T-shirts, hats, sweaters, etc. For kids, tweens, and families. Registration required.

Homeschoolers, get ready to tell the world about your favorite book! Prepare a creative book report at home and present it informally to other families in a science fair-style format. What you create to represent your book is up to you. Build a diorama, design a game based on the plot and characters, or make a poster for the movie version. Or you might create a book in a bag project, make a clothes hanger mobile, or draw the story in a comic book format. The possibilities are endless! For homeschool students in grades K – 8.
Register here to be a book presenter. Registration opens on Fri., Nov. 3 at 10 a.m. and closes on Thu., Dec. 7 at 1 p.m. Please make sure that each participating student registers separately.
If you aren’t ready to present a book report yourself, drop by to support other homeschoolers by browsing the projects and discover your next favorite book!
When: Fri., Dec. 8 from 1 - 2 p.m.
Where: East Library
Need ideas to help you get started? Take a look at our idea file.

Poetry creates opportunities for children to explore a variety of topics and emotions through writing, and Pikes Peak Library District’s annual Jean Ciavonne Poetry Contest engages 4th and 5th-grade writers. 2024's theme was Lost & Found: Poems of Importance. Young poets reflected on something they had lost or found in the last few years as they worked with poetic devices like imagery, form, meter, and rich vocabulary to create an original poem for a chance to win a prize. This contest continues Jean Ciavonne’s legacy of connecting children with poetry and writing.
Congratulations to our 2024 winners!
- Elsie Byrne, 5th Grade, Homeschool - "Overlooked"
- Lilia Gerber, 5th Grade, Gerber Homeschool - “Black and Brown Again”
- Enray Liu, 4th Grade, The Classical Academy Central Elementary - “Melody of Courage”
- Clara Pavri, 5th Grade, Colorado International Language Academy - “Figures on a Crinkled Map”
- Sara Schmidt, 5th Grade, Thomas Maclaren School - “My Lost Heart”
- Sienna Shafer, 5th Grade, Monument Academy - “The Best Dream”
Jean Ciavonne Remembered from PPLD TV on Vimeo.

In November, Pikes Peak Library District (PPLD) joins with people and organizations across the nation to draw attention to hunger and homelessness through education, programs, and events.
Pikes Peak Library District Collects to Share is once again putting out the call to collect hand-crafted items for our community shelters. Starting in November, as part of Hunger & Homelessness Awareness Week, we will be accepting donations every month for a year. If you have knitted items such as hats, scarves, socks, and blankets that you would like to donate, please bring them to the public desk at any Library location and let staff know that they are for PPLD Collects to Share. Through your hard work and creative generosity, we donated over 120 hand-crafted items to those in need in our community since November 2022. Thank you!
Programs
- Community Conversation: Hunger and Homelessness Awareness
Thu/. Nov. 16, 6 - 8 p.m. at the East Library Community Meeting Room, click here for more information on panelists
Resources
- Helping Hands Community Resource
The Helping Hands El Paso County Community Resources guide is a list of services available in El Paso County. - PPLD Community Resource Officers
Pikes Peak Library District offers community resources across the District. Our Community Resources Specialists are here to help you navigate and connect with services by providing referrals and information to get the help you need for your specific situation.
Website Links
- Hunger & Homelessness Awareness Week
Hunger and Homelessness Awareness Week is sponsored by the National Coalition for the Homeless and the National Student Campaign Against Hunger and Homelessness.
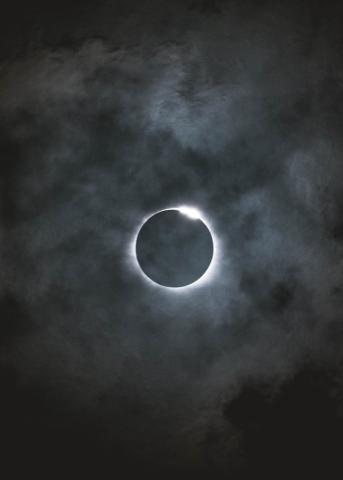
Materials for this eclipse Take and Make will be available at area PPLD libraries beginning Friday, October 13, 2023.
Materials and Instructions
Materials Included in Take and Make:
Black paper
Circle template
White, non-toxic chalk
You provide:
Pencil
Scissors
Masking Tape
OPTIONAL: Brightly colored construction paper or foam sheets for cut-out horizon detail.
Instructions: See pdf file below for more pictures and science information.
1. Place the template on a piece of dark paper. Secure with a loop of masking tape or simply hold down with one hand.
2. Draw a thick circle of chalk around the template. Go around 2 or 3 times. It does not need to be neat.
3. Holding the template in place, smudge the chalk away from the center of the circle using a finger to create the corona of the Sun.
4, When you are done smudging, remove the circle template.
5. Add words, pictures, or fun designs.

Take a spooky stroll in Old Colorado City and read Trick Arrr Treat by Leslie Kimmelman. Pick up a map at Old Colorado City Library, or print one here, and stop by each location to read the book. The story will be available Oct. 1 - 31.
Old Colorado City October Strolls
Trick Arrr Treat by Leslie Kimmelman - Download the map!
The free supplies for this September Take and Make will be available at area PPLD libraries beginning September 8, 2023.
Materials and Directions:
Materials we provide:
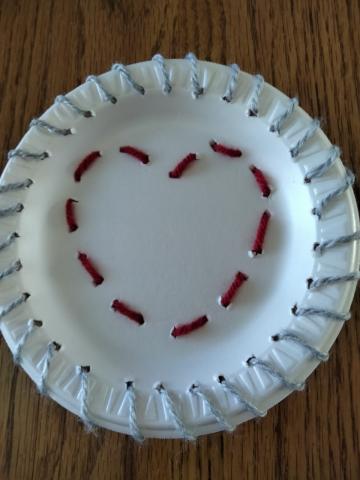
plastic needle, yarn, styrofoam plates
Materials you provide:
pencil, scissors, tape, scrap paper (optional)
Directions:
Here are tutorials (https://tinyurl.com/bdfv82kk) for basic sewing stitches. We recommend running stitch, backstitch, whip stitch, and cross stitch for this project. Also, see additional photos in the pdf file provided.
Running stitch and Backstitch – great for sewing straight lines
Whip Stitch – great for adding a border
Cross Stitch – great for adding details
Step 1:
Use your pencil to create a design on your plate by gently poking the pencil through the plate. The holes should be at least ½" apart. (You may want to draw it on scratch paper first.)
Step 2:
Cut a piece of yarn no longer than your arm. Thread it through the needle. It may help to tie one end of the yarn to the needle so it doesn’t come unthreaded. You should have a long end and a shorter end.
Step 3:
Beginning at the back of the plate, sew in and out of the holes you poked to complete your design. Pull the yarn taut after each stitch, but don’t pull too hard and tear the plate. You may tape the end of the yarn to the back of the plate to hold it. When you run out of yarn you can either continue with the same color or begin a new color.
Use the second plate to create a different design.

Hispanic Heritage Month is celebrated from Fri., Sept. 15 - Sun., Oct. 15, recognizing the contributions and influence of Hispanic Americans to the history, culture, and achievements of the United States. The Library offers several opportunities to learn and celebrate. Scroll down to explore resources celebrating Hispanic heritage.
Hispanic Heritage Month Recipe Cards
Learn about favorite foods and make recipes from some of the cultures celebrated during Hispanic Heritage Month. Available at all locations starting Fri., Sept. 15.
Resources
- Adults:
- Hoopla
- Kanopy films
- Colorado Experience
Justicia Y Libertad (27 min., NR) 1968 was a pivotal year in American history: The Vietnam War hit its peak, Martin Luther King, Jr. was assassinated, and riots shook the Democratic National Convention in Chicago. At home in Colorado, it marked the birth of the Chicano Movement. These pivotal times brought political activist Corky Gonzalez to the forefront as an early pioneer of equal rights for Mexican Americans.
- Regional History & Genealogy
- Archival Collections
- Heidi Vazquez Guy Records (MSS 0408)
The Heidi Vazquez Guy Records consist of two series: Biographical Files and VHS Tapes. Biographical information provided in each file includes: birthdate, parents names, names and number of children, education, careers, and Colorado memories. Most files also include a photograph. The VHS tapes contain oral history interviews of people in the Biographical Files conducted by Heidi Vazquez Guy. See staff in Regional History & Genealogy if you want to find out more about this collection. - De Donde Eres oral histories
Conducted between the years 2003 -2005, ¿De Donde Eres? was an oral history project organized by Pikes Peak Library District’s Special Collections in an effort to document and promote understanding of the region’s Hispanic community and their many contributions to Colorado Springs. The collection is comprised of 25 individual videotaped interviews which have been digitized into audio-only format. A complete listing of the project interviews is available at the Regional History & Genealogy reference desk and transcripts are available for a few of the oral histories.
- Heidi Vazquez Guy Records (MSS 0408)
- Young Adults:
- Families and Children:
- Enjoy some incredibly colorful costumes and dance from Ballet Folklórico México Danza to celebrate Hispanic Heritage Month! The music is so energetic you might want to get up and dance with your family! Click here to view the video.
- Children's Materials in Spanish at PPLD
- Color in Colorado Children's Booklist
- PBS Children's Booklist
- eBooks from Libby/Overdrive
- Children’s Booklist from ¡Colorín Colorado!
-
- Who's who among Hispanic Americans, by Gale Research Inc.
- Early Hispanic Colorado, 1678-1900, by Joseph P. Sánchez
- On the edge of purgatory: an archaeology of place in Hispanic Colorado, by Bonnie J. Clark
- Hispanics in the U.S. Civil War: a compiled list of men who fought for the Confederacy and the Union, compiled and edited by Ricardo J. Rodríguez
- Hispanic pioneers in Colorado and New Mexico, by Colorado Society of Hispanic Genealogy
- National Society of Hispanic Genealogy Newsletter, by NSHG
- Colorado Hispanic Genealogist, by Colorado Society of Hispanic Genealogy
- Colorado Hispanic Leadership Profiles: Who’s Who among Colorado’s Outstanding Leaders by Doug McNair
For more titles and information, visit Special Collections or search our catalog! Books are from the Carnegie Library - Special Collections. (Some titles are available for checkout from other library locations.)
- Websites
- HispanicHeritageMonth.gov Hosted by the Library of Congress, this site provides access to curated arts exhibits and collections, audio and video collections, and resources for Hispanic Heritage Month.
- La Fiesta Bonita Read about a historic local heritage celebration from right here in El Paso County posted by our friends at the Colorado Springs Pioneer Museum.
- National Archives – Hispanic Heritage Month
- National Today – Hispanic Heritage Month
- History.com Provides an overview of Hispanic Heritage Month.
Take and Makes for this project, for ages 5-12, will be available at area PPLD libaries beginning July 14, 2023.
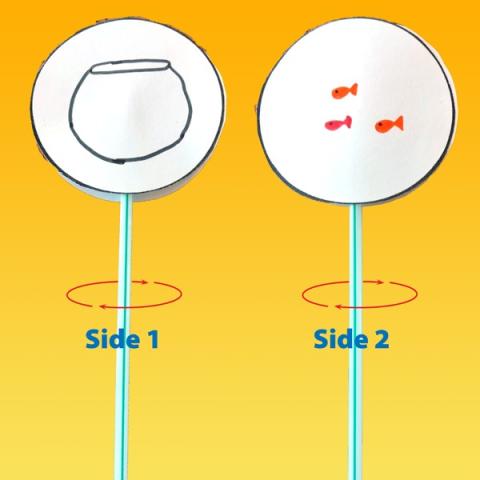
A thaumatrope is an optical toy that teaches persistence of vision.” The name thaumatrope means “wonder turner."
Materials and Directions:
Materials we provide:
cardstock templates
straws
Materials you need to provide:
Pencils, crayons, markers
tape
We have provided two options for this activity.
Option One:
Cut out the circles with the printed templates.
Option Two:
Cut out the blank circles. With one on top of the other, draw an image on the top circle. If youpress firmly with your pencil as you draw, you will be able to see the image on the bottom circle to better align your images. Draw a complimentary image on the second circle.
Both options:
Tape the end of a straw to the back of one circle. Carefully align and tape the other circle back-to-back with the first one.
Here are some ideas:
Bird in a cage (bird on one side, cage on the other)
Emojis (face on one side, yellow circle on the other)
Butterflies in a jar (butterflies on one side, jar on the other)
Giraffe with spots (solid giraffe on one side, giraffe outline with spots on the other)
Spider in a web (spider on one side and web on the other)
Fish in a bowl (fish on one side and bowl on the other)
Rocket on the moon (rocket on one side, moon on the other)
Dueling lightsabers (one lightsaber on each side)
Spin the Spin the straw between your hands. As it spins, the two pictures will appear to blend into one.

Supplies for this Take and Make, for ages 5-12, will be available at no cost at area PPLD libraries beginning Friday, June 9, 2023.
Supplies and Directions:
Lemonade Slushies are a great way to beat the summer heat! There’s little to no mess. They’re fun for all ages. And you get slushy goodness!
Supplies:
Materials provided: 1-gallon ziploc, 1-sandwich or quart ziploc, lemonade packet
Materials you provide: water, salt, ice, spoon, cup (optional), towel (optional)
Directions:
Place ice cubes and salt in the gallon sized ziploc bag. Start with 15-20 ice cubes and 1-2 tablespoons salt.
Mix HALF of a lemonade powder packet and 8 – 10 ounces of water in the smaller ziploc. Remove as much excess air as possible and seal the bag.
Place the bag with lemonade into the bag of ice and salt. Seal the large ziploc.
Shake or knead the bags for about 5 minutes until your lemonade has become a slushie. If the bags get too cold, wrap them in a towel.
Carefully remove the lemonade bag from the larger bag. You don’t want to get salt in your lemonade. Pour it into a cup to eat it or eat it right out of the bag.
Tips:
If it seems to be taking too long, add more salt and ice.
Other beverages also work, so experiment to find your favorite.
Supplies for this Take and Make will be available at area PPLD libraries beginning May 12, 2023.
Materials and Directions:
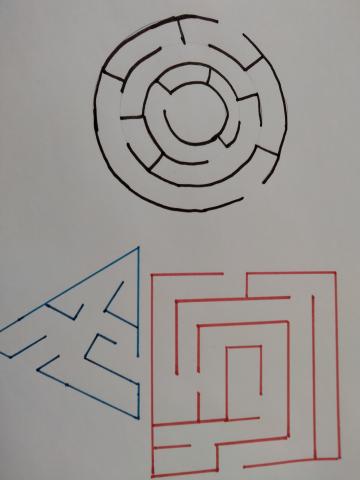
Use the provided paper or your own supplies to draw a shape to race around on your magnet track. You might choose a vehicle (car, truck, train, boat, etc.), an animal (cow, fish, turtle, dog, etc.), or something entirely different. It should be small enough to go on your paper plate (less than 2 inches). Attach a magnet to the back using double-sided tape or a glue dot.
Use your own markers, crayons, or colored pencils to create a course on your race track.
Use double-sided tape or a glue to to attach a magnet to the end of your craft stick. Before you glue, you need to make sure that the magnet on the car and the magnet on the stick attract rather than repel each other. If they repel each other, turn the magnet for the stick over before attaching.
Test your track! Set your shape (vehicle, animal, or other) on your track. Use the magnet on the craft stick under the plate to move and race the car.
Have fun!
Find the tutorial video at https://ppld.librarymarket.com/virtual-kidsmake-magnetic-race-tracks
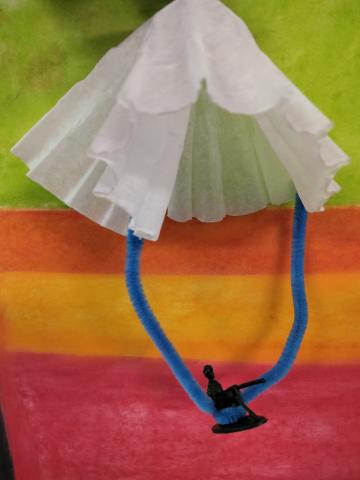
The free materials for this Take and Make (for ages 5-12), will be available at area PPLD libraries beginning April 14, 2023.
Materials and Directions:
Materials we provide:
Coffee Filter
Pipe Cleaner
Military person toy
Secure the Military person to the center of the pipe cleaner. You may choose to wrap the pipe cleaner around your person or thread it through any openings.
Poke one end of the pipe cleaner through the edge of the coffee filter. Poke the other end through the opposite side. Fold over the ends to secure.
Drop from a high place (or toss in the air) to watch your parachutist float down. It may help to pinch the center of the coffee filter first.

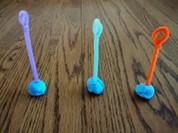
Free materials for this Take and Make, for ages 5-12, are available starting today at area PPLD libraries. For more pictures of this project, click on the pdf link included at the end.
Materials and Directions:
Materials we provide:
Circle Template
Large Paper Clip
Large Straw
Materials you provide:
Scissors
Tape
Markers
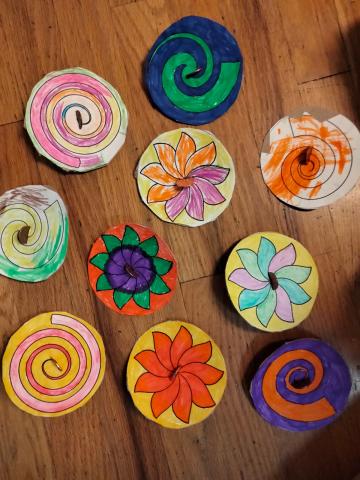
1. Color the sections of the circle template with rainbow colors.
2. Cut the circle out. Also cut on the lines between each color, stopping about ½” from the center. Fold flaps down.
3. Straighten the paper clip and then fold a small part of one end down to a 90 degree angle. Carefully poke the paper clip through the center of the circle and tape the small folded part to the colored side.
4. Bend the other end of the paper clip so it can be inserted in the straw and stay secure. Cut the length of the straw in half.
5. To fly your spinner, hold it between your palms with the circle at the top. Roll it quickly and let go. It should spin and float. The colors will blend as it flies. It may take some practice.

Call for art! It's time to get creative!
Homeschoolers can submit one artwork (drawing, painting, sculpture, needlework, etc.) for this non-juried exhibit. Drop off your entry at the East Library Children's Department from Mon., March 18 – Thu., March 28, 2024.
Artwork will be displayed throughout the month of April. Grades K - 12. Contact jfleishhacker@ppld.org for more information.
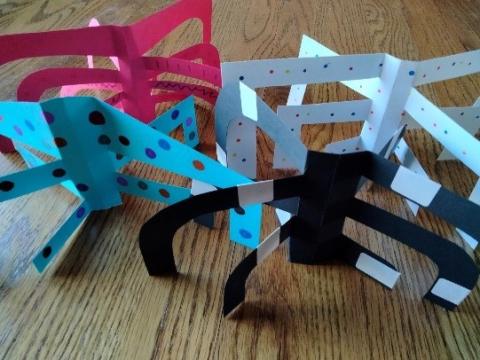
Take and Makes for this project, for ages 5-12, will be available at PPLD locations beginning Friday, January 13, 2023.
Supplies and Directions:
Materials we provide:
Colored Cardstock
Stickers
Materials you provide:
Scissors
Markers, crayons, or colored pencils
Alexander Calder was an American sculpture known for his colorful giant sculptures . See some examples of Calder's work in the pdf link below.
Directions:
1. Take a cardstock rectangle. Decorate it with markers, crayons, or colored pencils if desired.
2. Fold it in half.
3. Make cuts similar to those in the picture that almost reach the fold.
4. Unfold.
5. If desired, use colored stickers to decorate.
6. Fold, alternating folding one toward the back and the next toward the front. Alternate this way to allow your sculpture to stand. (For example, the right side would be back, front, back, front, etc. and the left side would be front, back, front, back, etc.)
Get creative with your cutting to create additional amazing sculptures!

Reflecting on 2022 and looking ahead
As we welcome 2023 and what’s to come, I want to take a moment and reflect on the past year for Pikes Peak Library District (PPLD).
The Library has been a staple in our community for more than 130 years, evolving to become a public institution that offers physical and digital spaces for belonging, personal growth, and strong communities. Thanks to the investment from El Paso County taxpayers, we can provide residents like you with access to 16 facilities, three mobile library services, and a large online hub of resources and services that are inclusive and welcoming to all.
Because of you, we were able to do so much for the community this past year. PPLD connected hundreds of thousands of people with services, resources, and spaces to help them achieve their goals. Many patrons visited one of our libraries, whether to browse our collection and check out an item, attend a program, use a meeting or study room, create something in a makerspace or recording studio, or use a computer, copier, scanner, or something else they needed. Library cardholders checked out more than 4 million physical items, and we surpassed more than 2 million digital checkouts via OverDrive and Libby by the end of September 2022.
We hosted another year of successful programs that strive to improve literacy like the Winter Adult Reading Program, Summer Adventure for kids and teens, and All Pikes Peak Reads this past fall. PPLD expanded the PowerPass partnership program to include Calhan School District and Fountain-Fort Carson School District 8, providing more students with access to Library resources and services to help further their success in and out of the classroom. And we also added a few new museums and attractions to the Pikes Peak Culture Pass, meaning individuals and families can check out even more cultural experiences right here in our community and beyond.
In the spring of 2022, PPLD also announced its new vision, mission, and values. This became the starting point to develop a three-year strategic plan, which was publicly released in December and officially kicks off this month.
The plan for 2023 - 2025 was informed by staff and public input. Last summer, our team hosted multiple opportunities for Library patrons and other community members to engage with us as part of the planning process, and nearly 1,200 participated, whether online or in-person at one of our libraries. With rich qualitative data from the public and 400-plus staff, we uncovered several common themes – and those helped guide a strategic planning committee of staff, Board, and community representatives in identifying PPLD’s six areas of focus. If you want to find out more and see where, why, and how the Library District will reinvest taxpayer dollars back into the community through 2025, please visit ppld.org/strategicplan.
It's because of the community’s continued support for PPLD that we have been able to do all of this in 2022 and what we’re planning for 2023. Your investment, trust, and patronage truly are an investment into improving the Pikes Peak region for everyone.
We look forward to serving you throughout this new year – and using our new strategic plan to fulfill our mission, uphold our values, and aim to achieve our vision for this great community!
Teona Shainidze Krebs
Chief Librarian & CEO
Pikes Peak Library District

Get ready for a weekend of epic sports history! PPLD and the U.S. Olympic & Paralympic Museum have teamed up to offer a discount weekend at the museum for library cardholders. Share your library card (or card number) to enjoy interactive exhibits and an immersive and accessible look into the journey of Team USA’s Olympic and Paralympic athletes.
When:
- Sat., Jan. 28 from 9 a.m. - 6 p.m.
- Sun., Jan. 29 from 10 a.m. - 5 p.m
Present your library card at the museum for $10 admission. The PPLD Bookmobile will be on-site for library card registration and will also put on a special Storytime Saturday morning at 9 a.m.
Bookmobile on-site:
- Sat., Jan. 28 from 9 a.m. – noon
- Sun., Jan. 29 from 10 a.m. – noon

From a small reading room established 136 years ago, PPLD continues to evolve to meet the ever-changing needs of our sprawling community. Our service area covers 2,070 square miles of El Paso County with a population of nearly 700,000 – people of all ages and backgrounds with varying views and interests.
Thanks to taxpayer funding, we can continue to provide residents with access to 16 facilities, three mobile library services, and a large online hub of resources and services, all of which are inclusive and welcoming to everyone. The Library team strives to make its physical and digital spaces safe and respectful for diverse voices, perspectives, and pursuits; to foster community dialogue and connections; and to help people achieve their goals and dreams in life.
Overview and Process
In the winter and spring of 2022, our Board of Trustees and staff revisited PPLD’s mission statement and developed a vision statement and organizational values that best reflect our public library system and growing community in El Paso County.
This became our starting point to develop our new strategic plan for 2023 - 2025. After months of input from the public through surveys and in-person meetings, PPLD staff, Library patrons, and other community members and government officials, PPLD used the rich qualitative data it received from more than 1,600 responses to develop a new strategic plan for 2023 - 2025. Below are the six areas of focus the team identified that became the foundation of the plan.
Strategic Plan: Areas of Focus
PPLD publicly released this plan in detail on Dec. 6, 2022, so everyone could see where, why, and how PPLD will reinvest taxpayer dollars back into the community through 2025. We look forward to using our new strategic plan to fulfill our mission, uphold our values, and aim to achieve our vision for this great community.
View the complete plan here:
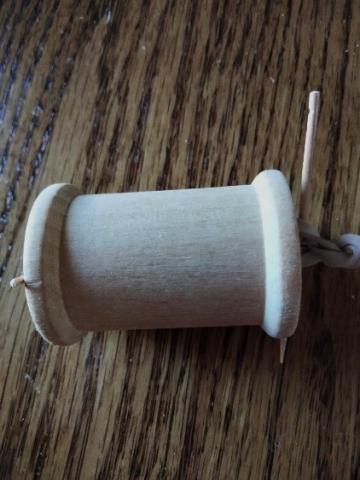
Free materials for this Take and Make will be available at area PPLD libraries beginning Dec. 9, 2023.
Materials provided:
Spool
Washer
Rubber Band
Toothpicks
Materials you provide:
Scissors
Tape
Markers, if desired
Directions: (see additional pictures in the pdf link below)
1. Use markers to decorate the spool, if desired.
2. Push the rubber band through the center of the spool. Use a toothpick to help poke it through if needed.
3. Break a toothpick, slide it through one rubber band loop, and secure it to the spool with tape.
4. Slide the washer onto the rubber band loop at the other end of the spool.
5. Insert a toothpick through the loop.
6. Wind the toothpick.
7. Set it down on a smooth surface and let go. Watch it race or spin!
8. Experiment with how you can adjust it to make it go straighter or farther. You can also race your friends.
How does your brain understand how far away something is? This experiment shows how your eyes work together to perceive distance.
Our eyes both face the same direction. Because they do, they produce slightly different views of the same object. Our brains are able to use this overlapping information (retinal disparity) to figure out how far away an object is. (If our eyes were on the sides of our heads like some animals, we would have poor depth perception.)
Try this: Close one eye and focus on a nearby object. Switch which eye is open and focus on the object again. You should see the object shift. Try it again with a faraway object. When you use just one eye, your brain can’t use feedback from both eyes to discern depth perception.
Materials needed:
Pipe cleaners – use half for each
Clay
Scissors
Pencils
Instructions:
1. Cut your full pipe cleaner in half. Use ½ pipe cleaner for each.
2. Bend the end of a pipe cleaner so you have a circle that’s slightly bigger than a pencil. Twist it to secure.
3. Use a bit of clay to make a stand for the pipe cleaner.
4. Make 2 more pipe cleaner stands with slightly bigger circles. You should have 3 pipe cleaners on stands.
5. Test your depth perception – Place the pipe cleaner with the largest opening on a table in front of you so you cannot see the opening. Close one eye and try to put the pencil through the hole. Try it again with both eyes open. Which is easier? Try it with each sized hole and see the difference.
6. If this is too easy, try getting a needle and thread and threading the needle with one eye closed!
Based on: https://www.kiwico.com/diy/stem/anatomy-biology/seeing-depth-perception
Take and Makes for this project will be available at area PPLD libraries on Oct. 14, 2022.
Supplies and Directions:
Materials we provide:
Paper Templates
Cardboard
Materials you provide:
Scissors
Penny
Glue
Markers, Crayons, or Colored Pencils
Directions:
Color your template. Glue the template to the cardboard. Cut out around your template.
Cut a small slit in the center of the circle to insert the penny. The slit needs to snugly hold the penny.
Spin. As it spins, note what you see.
The Science Behind it: Something in motion stays in motion unless a force acts upon it. In Penny Spinners, the friction between the penny and the surface slows it down and eventually causes it to stop. This project also shows color mixing as the colors combine when the spinner spins.
Take and Makes for this project, for ages 5-12, will be available at area PPLD libraries, beginning Sept. 9, 2022.
Supplies:
We provide:
Coffee Filters
Washable Markers
Leaf Template
Materials you provide:
Scissors
Cup of Water
Pencil
Directions:
(See pdf link below for additional pictures of this project.)
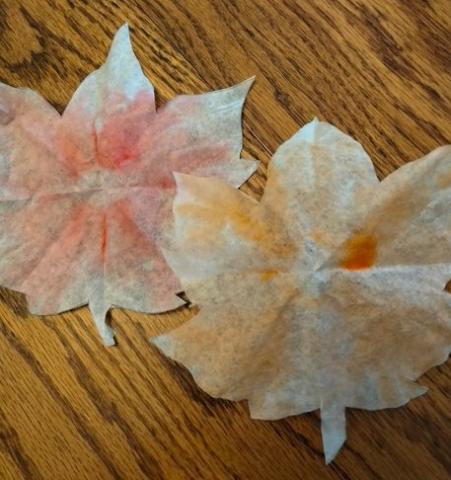
1. Stack your coffee filters. Use the template to trace a leaf on the top one. (If you’d prefer, just draw your own leaf.) Cut the leaves out through all the coffee filters.
2. Use a washable marker to draw a thick circle in the center of each coffee filter leaf. Do not fill in the center of the circle or color the entire leaf.
3. Fold the leaf 3 times (in half, in half again, and in half again). You should have a point in the middle of your circle.
4. Carefully dip the point of the leaf in the cup of water and hold it there until the leaf is saturated. It may need a minute or so. You will probably want a new cup of water for each leaf.
5. Let the leaves dry on a surface that can get color on it. Once they are dry, carefully unfold them.

This STEM project is a favorite from our quarantine days of virtual programming.
Supplies:
Large jar (24 oz. spaghetti sauce jar or a large mason jar)
Water - 2 1/2 cups water (or until it reaches 3/4 of the way up the jar)
Oil - 1/2 cup
Sprinkle in as much salt as necessary but you'd need about 1/4 cup total
Food coloring (optional)
Directions:
Pour water 3/4 to the top of a mason jar. Stir in optional food coloring.
Pour oil into jar. Allow water and oil to separate.
Sprinkle salt into jar. Watch the reaction occur and make observations.
Watch this project at: https://www.youtube.com/watch?v=v3qhs9SW-RA