

 We are experiencing recent outages to the online catalog, PPLD mobile app, and Libby/OverDrive. Click here to learn more.
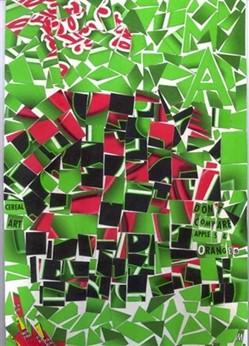
TAKE AND MAKES for this homeschool project (Ages 7 Up) will be available at area PPLD libraries beginning Friday, Oct. 22, 2021.
Watch the Cerealism: Out-of-the-Box-Art video tutorial on YouTube: https://youtu.be/kHjyAqjtMUst
Supplies Included in Take and Make and Needed from Home
In Take and Make:
- Cereal box or other consumer brand box (if your Take and Make does not include one, you can use one from home)
- Book jacket / scrapbooking paper
- Examples of Cerealism Collage sheet
From Home:
- Scissors
- Clear Elmer’s glue
Directions: You can find all the instructions with explanatory photos in the video and pdf link below.
Step 1: Prepare Your Box
- Open your cereal (or other consumer brand) box at both ends.
- Open the cereal box along the glued side seam so that it lays flat.
- Cut the front cover away from the back, along the side panel connected to the back.
- Cut off all top and bottom flaps. *Save the flaps
- Cut away the side panel from the front cover.
- Cut away the narrow strip from the outside of the back cover.
The front box cover will be your collage material. The back cover with side panel will serve as the foundation/background for gluing your collage to.
Step 2: Decide How You Will Cut Your Front Cover into Collage Pieces
Choose one of these four ways to cut your box cover (but wait until Step 4 to cut).
- Cut down the long side of your box front, making strips about ¼ inch wide. Cut each strip into 3 to 5 pieces. Arrange them “boardwalk” style, placing the pieces out of order.
- OR cut your box front horizontally, into 4 thick strips. Cut each strip into 3 squares. Cut each square into smaller squares and rectangles.
- OR cut your box front in half horizontally. Cut each half into 4 squares. Cut each square into random angles (e.g., triangles and trapezoids).
- OR you can combine all cutting techniques … strips, squares and rectangles, and random angles. (*WARNING: This choice is very challenging to collage!)
Step 3: Decide How You Will Sign Your Artwork (just like Michael Albert, Cerealism Artist)
Three ways to find/make your initials for “signing” your collage:
- Using the flaps from your box, look for the first letter of both your first and last name. If you find letters that are the size and style you like, cut around them in a square or rectangle and save them to add to your collage later.
- OR make your initials in block letters on the back of one of the box flaps and cut out around the shape of the letters. When you turn them over, they’ll look just like the cereal box and will be very tricky to find in your collage.
- OR you can search for your initials on the book jacket in your Take and Make, cut out around them in a square or rectangle, and place them in your collage later on.
Step 4: Create Your Cerealism Masterpiece
*TIP: Work from bottom to top OR top to bottom.
- It helps to cut about an inch wide strip off the top of your box front.
- Next, cut your box into sections using one of the cutting techniques above (Step 2).
- Each time you cut up a smaller section, practice arranging the pieces on your background. NO GLUE YET!
- As you arrange, decide on how much space you’ll leave between pieces.
- Cut larger pieces into smaller pieces when you need to. You’ll need all sizes to fit your spaces. You can also cut small pieces from your leftover box flaps and panels.
- When you’re ready to glue a section down, do it one piece at a time. Place a small dot of glue on the back of your piece, smooth it over the back surface, place your piece, and press firmly.
- When you have glued the first section down, continue to cut, arrange and glue one section at a time.
- Remember to add your initials into your collage somewhere in a bottom section!
- When your collage is complete, you can frame it by cutting the book jacket and/or the decorative paper into mosaic-like pieces, gluing them down to make an interesting border OR … you can just trim the background to fit the finished collage!
- Challenge your masterpiece admirers to find your “signature”!