

 Ruth Holley Library will be temporarily closed for approximately one week starting Mon., Dec. 2 to complete roof repairs.
Supplies:
- TP tube
- Mylar sheet
- Straw
- Cardstock circle
- Scissors
- Ruler
- Tape
- Markers or other things to decorate
Directions:
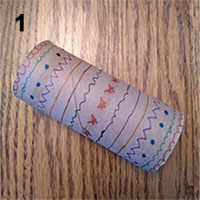
- If you'd like, decorate your tp tube.
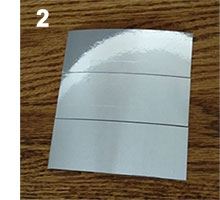
- Cut the mylar sheet into 3 equal pieces that fit to make a triangle inside the tube without falling out. Cut them a little bigger to start first. We cut ours 10 cm x 3.6 cm (3.94 inches x 1.42 inches).
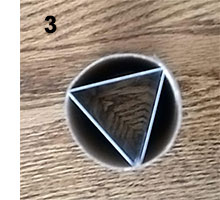
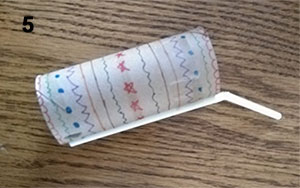
- Line up the mylar strips with a tiny strip between them. Tape them together. Then tape them together into a triangle. The shiny side is toward the center. Slide the triangle into the tube.
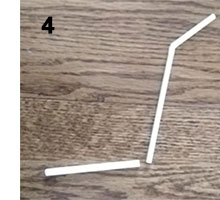
- Cut the straw so the bendy end is about 6 inches long. Tape it to the tp tube so the bendy part hangs over the end.
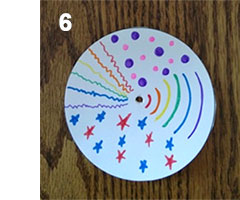
- Cut out your cardstock circle. Poke a hole in the center. Decorate the circle using markers, stickers or anything else you have at home.
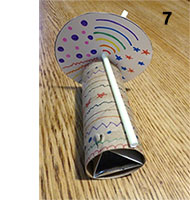
- Place the straw through the hole in the circle. Slide it until the circle is over the bendy part of the straw so it turns easily.
Look into your kaleidoscope and manually turn the circle. You should see lots of changing designs!

Take and Makes for this project will be available at area PPLD libraries beginning Friday, August 20, 2021. Watch this project at: https://youtu.be/bShFYRZCMW4?list=PLMEg2Dd0dSFenhH3jVzKk-QmaHXdAFOBq
Supplies and directions:
Provided in your bag: rocket template, straw, and pipette
From home: markers, scissors, and tape
Step 1
Color your rocket and cut it out.
Step 2
Trim your pipette with scissors so that it fits on the back of your rocket; tape in place with the
opening pointing down.
Step 3
Trim your straw to whatever size you want, put it in your pipette, and you're ready to launch!
Give your straw a big puff of air and watch your rocket fly!

Take and Makes for this project will be available at area PPLD libraries starting this Friday, August 13, 2021. Watch this project at https://youtu.be/zGzv7SBx9Iw
Supplies and Directions:
Materials Included:
- 4 washable markers
- A pipette
- A paintbrush
- White paper
Materials You Provide:
- A few crayons of different colors
- A small glass of water
- A cookie sheet or other flat board or tray
- Some scotch tape
- Use some scotch tape to tape the corners of a piece of the white paper to a cookie tray or other flat board. This will help to keep your paper from blowing away.
- Find a sunny spot in a window or a place outside to set your tray. It should be a spot where the sun will shine on your paper for several hours. Use the pipette to make a puddle of water in the middle of the paper. Make the puddle big enough so that the water almost reaches the sides of the paper. Use a crayon to draw around the shape of the puddle. Be careful to draw around the water, not through it.
- Wait an hour or so and check on your puddle. Did the puddle shrink? Did it change shape? Use a different color crayon to draw around the puddle’s new shape.
- After another hour or so, check again. Each time you check, your puddle will be smaller and you will need to draw a new line with a different color crayon around the new shape. This process will take some time – at least a few hours - so you can do other things while you wait.
- After your puddle is completely dry, you should see rings of different color crayon shapes on your paper. Use the markers to color in between the crayon shapes. You can do this any way you want. Then wet the paintbrush in your glass of water and brush over the marker colors you made on the paper to spread the colors. It will look like a watercolor painting! The water won’t stick to the places where the crayon is, so you will still be able to see the original shapes.
You and the power of the sun have teamed up to make some beautiful Evaporation Art!
Here’s the science behind the project:
Evaporation happens when water, a liquid, turns into vapor, a gas, and rises up. You’ve seen what happens to a puddle after a rainstorm. Does the water stay there forever? No. The heat of the sun causes the water to turn into a vapor. It evaporates, and the puddle disappears. The same thing happens in our project. The little puddle you create will evaporate and shrink when exposed to the heat of the sun until it is gone.