

Take and Makes for this Make project will be available at area PPLD libraries beginning Friday, Oct. 15, 2021.
Supplies and Directions:
Step 1.
Gather your supplies.
Provided in your bag: cardstock leaves to color and cut out, pipe cleaners
From home: colored pencils/crayons/markers, scissors, tape or glue
Step 2.
Color in your leaves (or find some real leaves outside!). Try mixing colors to get your perfect fall leaf. Using a marker or pen, draw faces on your leaves.
Step 3.
Cut out each leaf carefully (you might need a grownup’s help with this).
Step 4.
For each leaf: cut a pipe cleaner in half. Tape or glue both halves to the back for the arms and legs. Bend them however you like to make your leaf unique!
Step 5.
Have fun with your little leaf sprite friends!
Take and Makes for this project are available starting today, Oct. 8, 2021, at area PPLD libraries.
Supplies and Directions:
Materials Provided: White Tissue Paper, Balloon
Materials you Provide: Scissors, Head of Hair, Marker, Spooky Music (optional), tape (optional)
Directions:
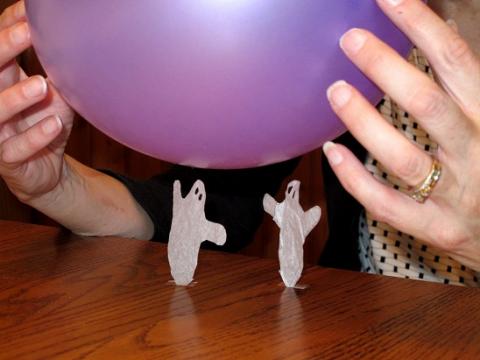
Cut several ghosts out of your tissue paper. Each ghost should be about 1.5 inches long. Draw eyes on each ghost with your marker.
Place your ghosts on a flat surface.
Blow up your balloon and tie the end. Rub it through your hair really fast for about 10 seconds to add a static charge.
Move the balloon near your ghosts. They should begin to rise toward the balloon. See if you can get them to rise, move, and dance around. You should be able to get the ghost to move from several inches away.
If you want the ghost to rise without sticking to the balloon, try taping just the tip to your surface.
The Science behind it:
As you rub the balloon through your hair, you are building up negatively charged electrons on the surface of the balloon. They are then able to pull light positively charged items toward them.
Take and Makes for this project for ages 9-12 will be available at area PPLD libraries beginning Friday, Oct 1, 2021.
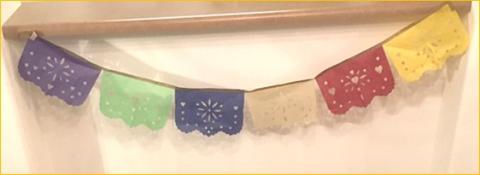
Celebrate Hispanic Heritage Month by making papel picado, “punched” or “perforated” paper. This traditional folk art is often made by drawing an intricate design and using a chisel to cut several layers of tissue paper. Because this art form is created using materials that disintegrate in the elements, not many historical pieces remain. Often elaborate, these festive banners are used at many celebrations in Mexico and areas with Hispanic roots and heritage. Use scissors to cut out your own version of this traditional art form.
Supplies and Directions:
Tissue paper, scissors, template (find online or draw), tape (washi or masking)
- Find or draw a symmetrical design to use as a template. Check out one of the links below for ideas. Fold the template in half.
- Stack two to three pieces of tissue paper in a pile and fold it in half.
- Slip the tissue paper inside the folded template so the folded edges are on one side.
- Cut out the outside of the template, cutting through the tissue paper inside.
- Cut out the inside shapes in the template, folding the template around to gain better access to the different shapes to cut out.
- Once the template is entirely cut out, remove the tissue paper pieces and unfold them.
- Repeat steps 1-6 with more templates and tissue paper.
- Using a long, flat surface, such as a table, unroll a long strip of washi or masking tape, leaving it attached to the roll.
- Starting at the end, attach the top of each papel picado (tissue paper design) to the washi or masking tape. Unroll more tape as needed, tearing it off the roll once all papel picado have been attached to the banner.
- Fold over any tape hanging over across the top of the banner.
- Hang your banner up and enjoy!
Adapted from https://happythought.co.uk/how-to-make-papel-picado/
More information about papel picado can be found at https://www.internationalfolkart.org/learn/lesson-plans/papel-picado-(d…