


Free materials for this Take and Make, for ages 5-12, are available starting today at area PPLD libraries. For more pictures of this project, click on the pdf link included at the end.
Materials and Directions:
Materials we provide:
Circle Template
Large Paper Clip
Large Straw
Materials you provide:
Scissors
Tape
Markers
1. Color the sections of the circle template with rainbow colors.
2. Cut the circle out. Also cut on the lines between each color, stopping about ½” from the center. Fold flaps down.
3. Straighten the paper clip and then fold a small part of one end down to a 90 degree angle. Carefully poke the paper clip through the center of the circle and tape the small folded part to the colored side.
4. Bend the other end of the paper clip so it can be inserted in the straw and stay secure. Cut the length of the straw in half.
5. To fly your spinner, hold it between your palms with the circle at the top. Roll it quickly and let go. It should spin and float. The colors will blend as it flies. It may take some practice.

Call for art! It's time to get creative!
Homeschoolers can submit one artwork (drawing, painting, sculpture, needlework, etc.) for this non-juried exhibit. Drop off your entry at the East Library Children's Department from Mon., March 18 – Thu., March 28, 2024.
Artwork will be displayed throughout the month of April. Grades K - 12. Contact jfleishhacker@ppld.org for more information.
Take and Makes for this project, for ages 5-12, will be available at PPLD locations beginning Friday, January 13, 2023.
Supplies and Directions:
Materials we provide:
Colored Cardstock
Stickers
Materials you provide:
Scissors
Markers, crayons, or colored pencils
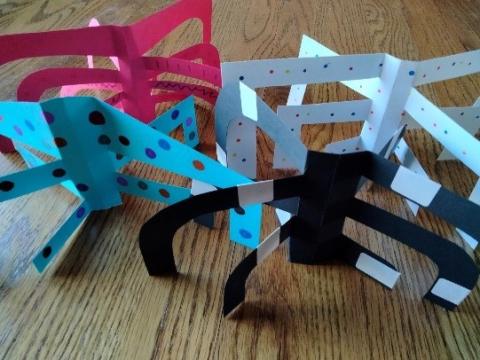
Alexander Calder was an American sculpture known for his colorful giant sculptures . See some examples of Calder's work in the pdf link below.
Directions:
1. Take a cardstock rectangle. Decorate it with markers, crayons, or colored pencils if desired.
2. Fold it in half.
3. Make cuts similar to those in the picture that almost reach the fold.
4. Unfold.
5. If desired, use colored stickers to decorate.
6. Fold, alternating folding one toward the back and the next toward the front. Alternate this way to allow your sculpture to stand. (For example, the right side would be back, front, back, front, etc. and the left side would be front, back, front, back, etc.)
Get creative with your cutting to create additional amazing sculptures!