

Materials for this eclipse Take and Make will be available at area PPLD libraries beginning Friday, October 13, 2023.
Materials and Instructions
Materials Included in Take and Make:
Black paper
Circle template
White, non-toxic chalk
You provide:
Pencil
Scissors
Masking Tape
OPTIONAL: Brightly colored construction paper or foam sheets for cut-out horizon detail.
Instructions: See pdf file below for more pictures and science information.
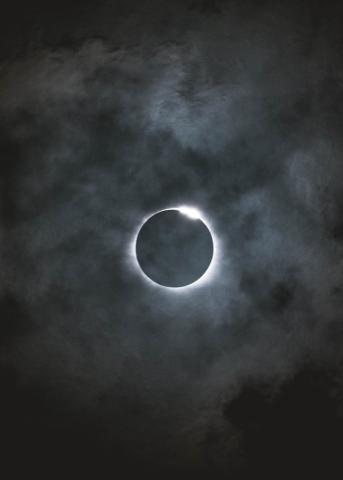
1. Place the template on a piece of dark paper. Secure with a loop of masking tape or simply hold down with one hand.
2. Draw a thick circle of chalk around the template. Go around 2 or 3 times. It does not need to be neat.
3. Holding the template in place, smudge the chalk away from the center of the circle using a finger to create the corona of the Sun.
4, When you are done smudging, remove the circle template.
5. Add words, pictures, or fun designs.
The free supplies for this September Take and Make will be available at area PPLD libraries beginning September 8, 2023.
Materials and Directions:
Materials we provide:
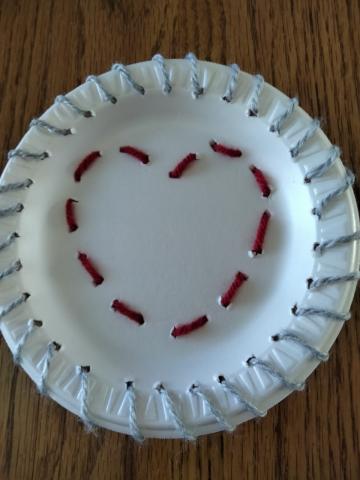
plastic needle, yarn, styrofoam plates
Materials you provide:
pencil, scissors, tape, scrap paper (optional)
Directions:
Here are tutorials (https://tinyurl.com/bdfv82kk) for basic sewing stitches. We recommend running stitch, backstitch, whip stitch, and cross stitch for this project. Also, see additional photos in the pdf file provided.
Running stitch and Backstitch – great for sewing straight lines
Whip Stitch – great for adding a border
Cross Stitch – great for adding details
Step 1:
Use your pencil to create a design on your plate by gently poking the pencil through the plate. The holes should be at least ½" apart. (You may want to draw it on scratch paper first.)
Step 2:
Cut a piece of yarn no longer than your arm. Thread it through the needle. It may help to tie one end of the yarn to the needle so it doesn’t come unthreaded. You should have a long end and a shorter end.
Step 3:
Beginning at the back of the plate, sew in and out of the holes you poked to complete your design. Pull the yarn taut after each stitch, but don’t pull too hard and tear the plate. You may tape the end of the yarn to the back of the plate to hold it. When you run out of yarn you can either continue with the same color or begin a new color.
Use the second plate to create a different design.
Take and Makes for this project, for ages 5-12, will be available at area PPLD libaries beginning July 14, 2023.
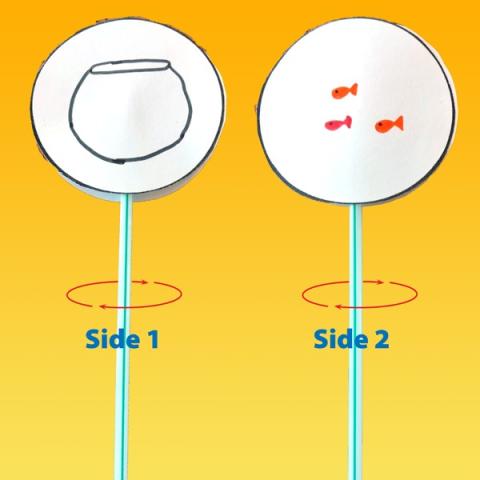
A thaumatrope is an optical toy that teaches persistence of vision.” The name thaumatrope means “wonder turner."
Materials and Directions:
Materials we provide:
cardstock templates
straws
Materials you need to provide:
Pencils, crayons, markers
tape
We have provided two options for this activity.
Option One:
Cut out the circles with the printed templates.
Option Two:
Cut out the blank circles. With one on top of the other, draw an image on the top circle. If youpress firmly with your pencil as you draw, you will be able to see the image on the bottom circle to better align your images. Draw a complimentary image on the second circle.
Both options:
Tape the end of a straw to the back of one circle. Carefully align and tape the other circle back-to-back with the first one.
Here are some ideas:
Bird in a cage (bird on one side, cage on the other)
Emojis (face on one side, yellow circle on the other)
Butterflies in a jar (butterflies on one side, jar on the other)
Giraffe with spots (solid giraffe on one side, giraffe outline with spots on the other)
Spider in a web (spider on one side and web on the other)
Fish in a bowl (fish on one side and bowl on the other)
Rocket on the moon (rocket on one side, moon on the other)
Dueling lightsabers (one lightsaber on each side)
Spin the Spin the straw between your hands. As it spins, the two pictures will appear to blend into one.