

 Ruth Holley Library will be temporarily closed for approximately one week starting Mon., Dec. 2 to complete roof repairs.
Categories
Take and Makes for this project will be available at area PPLD libraries beginning Friday, Dec. 10, 2021
Supplies and Directions:
Supplies in Take and Make:
- Cup
- Toothpick
- Sticker
- Flashlight
- Big Dipper template
Supplies you provide:
- Scissors
- Blank paper and crayons or markers, optional
Directions:
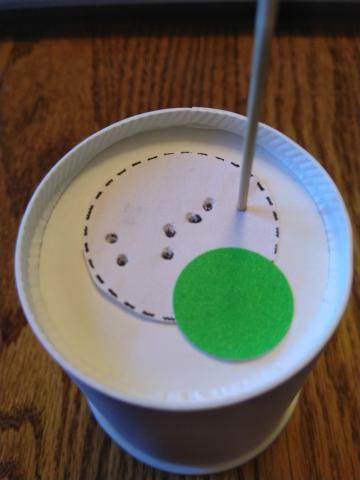
- Cut your Big Dipper template out on the dotted line.
- Turn your cup upside down and use the sticker to attach the template to the bottom of the cup.
- Use the toothpick to poke a hole in each “star”.
- Get your flashlight. Turn off the room lights and cover the windows.
- Shine the light through the cup and onto the table or flat surface. Experiment to find the spot where you see the Big Dipper.
Think about it:
What could you do if you had a second flashlight? Could you make the Big Dipper disappear without turning off your flashlight?
Try this with a friend:
Get a flashlight for each of you. Have one of you be the Starmaker and one the Sunshine.
The Starmaker should project the Big Dipper onto your surface.
While the Starmaker has the Big Dipper projected, the Sunshine should use their flashlight to mimic the rising sun. What do you see?
What about when the Sunshine mimics the setting sun?
Think about it:
Why do stars only come out at night?
Is the sun the only light source that keeps us from seeing stars?
Is it harder to see stars in the city or country?
Follow up:
Can you make other constellations?
Can you find the Big Dipper outside in the night sky? Why or why not?
Can you draw a backdrop on which to project your constellation?
Based on https://mysteryscience.com/sky/mystery-5/stars-daily-patterns/128

Take and Makes for this project, for ages 9-12, will be available at area PPLD libraries beginning Friday, Dec 3, 2021. Watch this project at: https://youtu.be/7UU9Yarq59Y?list=PLMEg2Dd0dSFebLULGu2RriY_RSSZgaH-X
Supplies & Directions:
Supplies provided in kit: cord, beads, keychain ring
Supplies from home: scissors
- Write down the initials of your name and decode them using the binary code key provided. (Or see pdf below for the code key.)
- Use blue and green beads to represent 0 and 1 - one color will represent the number zero, and the other color will represent the number one.
- Tie a double knot at the end of your cord.
- Put the beads for your first initial on the cord.
- Tie another double knot to separate the initials.
- Put the beads for your second initial on the cord.
- Tie a double knot.
- Use the remaining cord to either tie the beads around your wrist as a bracelet, or affix the cord to the keychain ring. Cut off any access cord. Enjoy your binary bracelet or keychain!
*This project was created in honor of Hour of Code. Learn more about Hour of Code at code.org!

The HIRE Vets Medallion Program has awarded Pikes Peak Library District the 2022 Gold HIRE Vets Medallion Award in honor of our investment in employing and retaining Veterans. This national program is part of the 2017 Honoring Investments in Recruiting and Employing American Military Veterans Act, which established rules for recognizing employers who hire Veterans. In order to be eligible for the gold medallion, an employer of PPLD’s size must have at least 7% of their workforce be Veterans, and retain more than 75% of their newly hired Veterans over 12 months. We are proud to have achieved this in 2021.
Our Library district achieved this in 2021 by having 28 Veteran employees, and hiring 3 Veterans in 2021 with a 100% retention rate. We are the only Colorado library district to receive this distinction in 2022. We are proud to work alongside these honored individuals as they continue to serve the community.