

Categories

Supplies:
- Epsom salt
- Hot water
- Jar
- Measuring cup
- Food coloring (optional)
- Spoon
- Bowl or cup for mixing
- Sand or small pebbles
Directions:
- You will need equal parts salt and water, you can decide how much based on the size of your jar. Measure out the salt and add it to your jar.
- Measure out the same amount of water and add to your mixing bowl or cup. If you are adding food coloring, put a few drops in the water and mix with your spoon.
- Pour colored water into jar with salt.
- Mix for 1-2 minutes.
- Add a tiny bit of sand or a pebble or two for the crystals to grow on.
- Put your jar in the fridge or, to jump start the process, put it in the freezer for 10 minutes before moving it into the fridge over night.
- Pour out the solution to reveal your crystals!
Watch this project at: https://youtu.be/e-OZVxuchkU

Presenting strategies for dealing with anxiety, tools for emotional awareness, themes of encouragement, hope, and love, these books, available in electronic formats, provide comfort during tough times.
Need help accessing electronic materials? Go to PPLD’s eLibrary to get started.
Click on link below to see booklist:
Supplies:
- Paper towel, wrapping paper, or toilet paper roll
- Paper to cover tube (optional) – Can use construction paper, brown bags, or wrapping paper
- Markers and/or crayons
- Elmer’s Glue or glue stick
- Scissors (Adult supervision needed.)
- Hole punch (You can use scissors if you don’t have a hole punch.)
- Scotch tape
- String, yarn, or ribbon
- Pipe cleaners, popsicle sticks, pencils, or rulers for marionette handle
- Miscellaneous items around the house (twist ties, buttons, etc.) to use for decorating
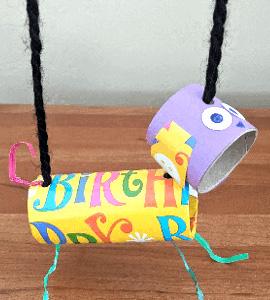
Directions:
- If you are using a paper towel roll, cut it in half.
- Take the half tube and cut it again about ¾ of the way down. The smaller part will be the head.
- Decorate the tube using paper, colors, paint, and/or stickers.
- Starting with the longer part of the tube, have an adult cut or punch holes on one side for legs. Cut/punch holes for the number of legs your creature will have. It can have as many or as few legs as you want.
- Make legs for your creature, using items around your house (twist ties, pipe cleaners, yarn, etc.). Once the legs are inserted in the holes, tape them in place.
- Create the head (small piece of paper towel tube). Add whatever details you want.
- Now you are ready to connect the head to the body. Punch or cut two holes on the opposite side of the legs. Then punch or cut two holes on the small tube – one on top and one directly underneath it.
- Cut 2 pieces of yarn, string, or ribbon the same length – at least 18 inches. Tie one piece of yarn to the front and one to the back of the long tube. Secure inside with a knot and tape.
- Take the yarn on the front side and slide the head on it. Make a knot inside the small tube to secure the head in place.
- To make the marionette cross bar, take to pencils (or rulers or craft sticks) and cross them to make an “X”. Tie the two pencils together using pipe cleaners, twist ties, or tape.
- Add the two strings attached to the puppet across from each other on one pencil. Secure with tape.
- Put on a play with your puppet and entertain your family!