

 Ruth Holley Library will be temporarily closed for approximately one week starting Mon., Dec. 2 to complete roof repairs.
Categories
The results are in! The Betty Field Youth Memorial Writing Contest, sponsored by the Friends of Pikes Peak Library District, is writing contest for youth in grades 6-12 that focuses on mystery stories. This year, 90 students submitted stories to the contest. These submissions were judged anonymously by volunteers from the Friends of the Library and Pikes Peak Library District staff, who entered over 400 scores for the stories!
6th Grade:
- 1st place: "Pluto Found Missing" by Madalynn Moorhead
- 2nd place: "Friend or Foe?" by Tristan Kumar
- 3rd place: "The Girl Erased from Time" by Hudson Sheperd
7th Grade:
- 1st place: "Scootered" by Jace Baehman
- 2nd place: "The Dissociative Killer" by Raina Seybert
- 3rd place: "The Case of the Cullinan Diamond" Daniel Bloomfield
8th Grade:
- 1st place: "Buried Memories" by Isabelle McNett
- 2nd place: "A Walk in the Woods" by Marian Griffiths
- 3rd place: "A Hole in the Roof" by Cannon Lockburner
9th and 10th Grade:
- 1st place: "Provocation" by Elaine Zou
- 2nd place: "Blue Girls and Zombie Kits" by Riley Ferl
- 3rd place: "The Ridge" by Angel Jimenez
11th and 12th Grade:
- 1st place: "The Puppetmaster" by Sierra Montgomery
- 2nd place: "Mystery of the Missing Happiness" by Evelyn Peake
- 3rd place: "An Odious Case" by Christian Alvis
Winners will be contacted via email with information about their prizes.

Supplies:
- Tall, clear glass cylinder vase or container (preferably straight)
- Food coloring
- Measuring cup
- Order of liquids needed for this density "burrito" (but you could do less liquid choices, but make sure to start with a heavy liquid and end with the lightest liquid):
- Honey
- Corn Syrup (add a couple drops of food coloring)
- Maple Syrup
- Whole Milk
- Dish Soap
- Water (add a couple drops of food coloring)
- Vegetable Oil (add a couple drops of food coloring)
- Rubbing Alcohol (add a couple drops of food coloring)
- Lamp Oil (DO NOT add food coloring to this liquid - it's doesn't mix in.)
- Tray
- Turkey Baster
- Items to sink or float: ping-pong ball, plastic beads, metal bolt, grape or cherry tomato, etc.
Directions:
- Determine how many ounces your container holds with room to spare at the top. Round up or down to a number that can easily be divided your number of liquid layers. Measure the exact amount of liquid ingredients into separate containers. (My large container held about 32 oz. leaving room at the top, so I divided 32 by 9, and then rounded the number down to a 1/3 c. of each liquid to make it easy to measure. Have a grown-up help you, especially with the lamp oil.)
- Place the large container on the tray.
- Add the liquids IN ORDER (they go from most dense to least dense).
- Starting with the honey, pour it very slowly so that it doesn't touch the sides of the container.
- Next, very slowly, dribble the corn syrup on top of the honey. Don't let it touch the sides of the container either.
- Again like the first two, slowly dribble the maple syrup into the container on top of the corn syrup.
- Using the turkey baster, add the milk very slowly. Now it helps to pour the liquids slowly down the sides of the container as you add them. You will add the next five liquids in the same manner.
- When all the liquids are in place. Add items and watch them sink or float or get stuck, depending on their weight and the density of the liquid where it stops.
Watch this project at: https://youtu.be/QjEYa6xBVRQ?list=PLMEg2Dd0dSFctLfDQxsL5SmuE8zkwQFmu

Supplies:
- 3 chenille stems for each figure
- 1 wooden bead big enough to be the head – 5/8 to 3/4 inch
- 1 or 2 regular-sized colored plastic drinking straws for each figure
- 5 pony beads for each figure
- Small wire cutters
- Scissors
- Ruler
- Permanent markers for the face
- Glue
- Optional: Yarn, extra chenille stems, felt scraps, or other decorative items
Directions:
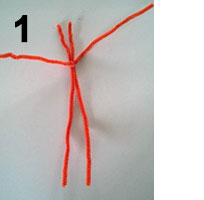
- Take one of the chenille stems and twist it around the other two about 2/3 of the way up; twist about three times, or enough so that they will not unwind. (See #1 picture below)
- Slide 3 pony beads over both of the “legs” up to the twist you made.
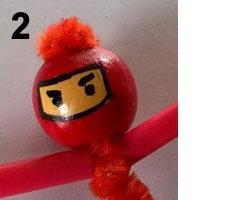
- With the permanent marker, draw a face on the bead; then slide the bead down over the middle two stems.(See #2 picture)
- Cut off some of the excess stem above the bead, but leave enough to coil it into a bun. Use a little glue to glue the bun flat to the “head.” (Alternate method: Cut several strands of yarn for hair and twist the excess stem over it to hold it in place.)
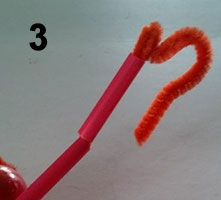
- With the scissors, snip eight sections of colored straw about 1 ¼ inches long.
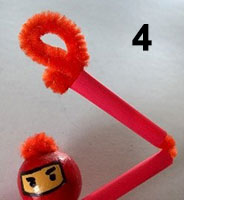
- Slide two of the sections over the “arms.” Twist the part of the stem that is sticking out to form mitten-type hands with thumbs. Tuck the excess stem back into the straw. (See #3 and #4 pictures)
- Slide a section of the straw over each “leg;” add a pony bead, and then the other section of straw. Form the part of the stem that is sticking out into a big foot so your figure can stand up. Tuck the excess stem back into the straw.
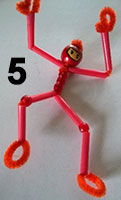
- If you want, you can decorate your figure with extra chenille stems, felt, yarn, or whatever you happen to have. You can make warriors, princesses, superheroes, knights – anything you want! (See #5 picture)
Watch this project at: https://youtu.be/UnGxbypCuBw?list=PLMEg2Dd0dSFctLfDQxsL5SmuE8zkwQFmu